Difference between revisions of "Sending Service java-less version"
| (6 intermediate revisions by the same user not shown) | |||
| Line 45: | Line 45: | ||
*Internet access | *Internet access | ||
*If you use a proxy, authorise outgoing calls to [https://www.e-file.lu www.e-file.lu]. Port 443 (HTTPS) must be open. | *If you use a proxy, authorise outgoing calls to [https://www.e-file.lu www.e-file.lu]. Port 443 (HTTPS) must be open. | ||
*<span style="color: #C00000">'''Administrator rights''' </span> to install the Sending Service <span style="color: #C00000">on the computer</span> ''(Windows Start button > Control Panel > User Accounts > Manage User Accounts)''. | *<span style="color: #C00000">'''Windows Administrator rights''' </span> to install the Sending Service <span style="color: #C00000">on the computer</span> ''(Windows Start button > Control Panel > User Accounts > Manage User Accounts)''. | ||
*OS: Windows - ''Linux will be developed'' | *OS: Windows - ''Linux will be developed'' | ||
*Processor: Pentium 2 GHz or equivalent | *Processor: Pentium 2 GHz or equivalent | ||
| Line 51: | Line 51: | ||
*300 MB of free space on hard disk drive. Think of providing regular purges. | *300 MB of free space on hard disk drive. Think of providing regular purges. | ||
*500 MB of free space on hard disk drive for logs. Regular purges are necessary as well. | *500 MB of free space on hard disk drive for logs. Regular purges are necessary as well. | ||
*A <span style="color: #C00000">'''Sending Service user''' </span>, ''for example: aacSD'', and its password, ''for example: formation'', have to be available [[E-file_Administration#e-file_administrator_functions_.28e-file_v1.29|'''=> e-file | *A <span style="color: #C00000">'''Sending Service user''' </span>, ''for example: aacSD'', and its password, ''for example: formation'', have to be available [[E-file_Administration#e-file_administrator_functions_.28e-file_v1.29|'''=> e-file administration''']]. | ||
*The e-file account of the Sending Service user has to be linked to groups/modules, ''for example FATCA reporting + profile "Sending Service".'' | *The e-file account of the Sending Service user has to be linked to groups/modules, ''for example FATCA reporting + profile "Sending Service".'' | ||
*A valid <span style="color: #C00000">'''keystore''' </span> (keystore.ks) and its <span style="color: #C00000">'''password''' </span> must be available | *A valid <span style="color: #C00000">'''keystore''' </span> (keystore.ks) and its <span style="color: #C00000">'''password''' </span> must be available | ||
| Line 253: | Line 253: | ||
== <u>Step 2</u>: Download the launcher. == | == <u>Step 2</u>: Download the launcher. == | ||
The official version is always on the production site. You will be asked for homologation or production environment during the installation process. </br> | The official version is always on the production site. You will be asked for homologation or production environment during the installation process. </br>To monitor and manage the properties, use the administration module on the relative website. | ||
To monitor and manage the properties, use the administration module on the relative website. | |||
Connect to www.e-file.lu as an administrator. | |||
Connect to www.e-file.lu as the sending service (or as an administrator). | |||
In the administration module, Sending service management – v2: | In the administration module, Sending service management – v2: | ||
| Line 271: | Line 271: | ||
[[File:SDjl_26.png|262x101px]] | [[File:SDjl_26.png|262x101px]] | ||
<span id="step-3-install-the-new-sending-service-with-the-launcher"></span> | |||
<blockquote>An alternative is to use this direct link, after logging into e-file :https://www.e-file.lu/fsq-graph/file/download/launcher-version/download?distribution=WINDOWS</blockquote><span id="step-3-install-the-new-sending-service-with-the-launcher"></span> | |||
== <u>Step 3</u>: Install the new Sending Service with the launcher == | == <u>Step 3</u>: Install the new Sending Service with the launcher == | ||
| Line 429: | Line 430: | ||
[[File:SDjl_32.png|195x333px]] | [[File:SDjl_32.png|195x333px]] | ||
You can relocate this folders tree to adapt it to your needs, using the administration interface to change the setup. | |||
Then either enter ''root folder + relative tree folder path'' or ''empty root folder'' and enter an ''absolute path'' for the listener : | |||
[[File:SDjl_ExplicPathFolder.png]] | |||
<span id="sending-folders"></span> | <span id="sending-folders"></span> | ||
==Sending Folders== | ==Default Sending Folders== | ||
Scroll this list to find the sending type you need and where you must copy your reports for them to be processed: | Scroll this list to find the sending type you need and where you must copy your reports for them to be processed: | ||
Latest revision as of 16:10, 26 March 2024
You can click on the picture.
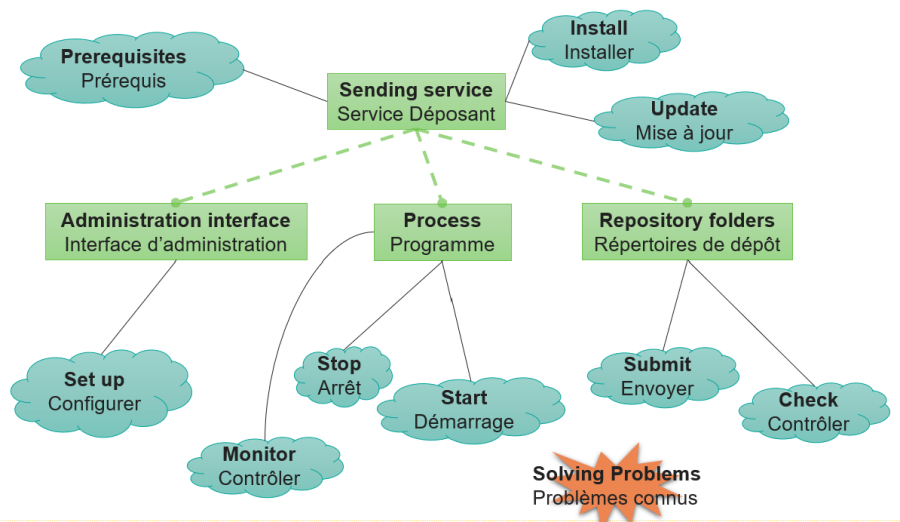
Purpose
The Sending Service is our solution for the automatic transmission of reports and documents to authorities.
It is an application consisting of a set of processes (called listeners) that periodically exchange files with authorities through a set of designated folders. Everything is configured via an administration interface.
This solution is useful if you have a large number of reports to submit or if the manual sending does not suit your needs.
Please be aware that, in this case you will have to provide the files yourself according to the authorities' file specifications.
This tool is compatible with most of the current operating systems (Windows / Unix / Linux) and is usually installed on a server on your side.
With a suitable network mapping, users can simply drop the file to be sent into the appropriate directory. It is then automatically encrypted and sent.
It is an application consisting of a set of processes (called listeners) that periodically exchange files with authorities through designated directories. Everything is configured via an administration interface.
Prerequisites
- Internet access
- If you use a proxy, authorise outgoing calls to www.e-file.lu. Port 443 (HTTPS) must be open.
- Windows Administrator rights to install the Sending Service on the computer (Windows Start button > Control Panel > User Accounts > Manage User Accounts).
- OS: Windows - Linux will be developed
- Processor: Pentium 2 GHz or equivalent
- 8 GB of RAM
- 300 MB of free space on hard disk drive. Think of providing regular purges.
- 500 MB of free space on hard disk drive for logs. Regular purges are necessary as well.
- A Sending Service user , for example: aacSD, and its password, for example: formation, have to be available => e-file administration.
- The e-file account of the Sending Service user has to be linked to groups/modules, for example FATCA reporting + profile "Sending Service".
- A valid keystore (keystore.ks) and its password must be available
- The Sending Service user has to be properly configured in the e-file user administration tool in order to be able to receive alerts (receipt of acknowledgement and feedback files).
Note that you can find the prerequisites for the manual transmission there : Transmission_Module#System_requirements
Process overview
The sending service can be run in the console mode through launcher.exe. It then runs in a line-command window which must stay open.
On the first launch see installation paragraph to locate it, otherwise start.
The sending service can also be installed as a Windows' service through run-as-service.bat. Once done, it is visible into the Windows' services list. Then it is launched on the workstation boot.
See chapter Start the application.
launcher.exe is the launcher application. It launches and updates the main application described below. It contains proxy and environment configuration files.
get-service-status.bat displays the status of the sending service when it is installed as a Windows service
remove-service.bat uninstalls the Windows service
run-as-service.bat installs then runs the sending service as a Windows service
sending-service.exe is located in the .\system\bin folder. This is the main application, used to send documents and containing all the business rules and configuration files linked to the operation of the application, such as dictionary-xsd and dictionary-workflow.
Folder hierarchy
Once installation is complete, three sub-folders will be present:
system: this is the folder containing the technical elements of the application, and contains also three sub-folders:
- bin: contains the main application executable
- config: contains all client configuration files
- log: contains all logs generated during application execution
sendingservice: this is the folder containing all the sub-folders in which we will place our files for sending.
For example, in the default configuration, if you want to send a KID file, you'll need to save the file in the following folder: sendingservice\fundregistration\luxembourg\opc
tmp: This is the folder containing all temporary files related to the application's operation.
Logs
Each process creates its own log.
sending-service.exe creates service-deposant-timestamp.log into .\system\log : it mainly contains information on the processing of your reports
launcher.exe creates launcher-timestamp.log into .\log : it contains in particular information about the installation process

In case you think something goes wrong, you can open these files into a text editor and check if you see error messages. Also send them to us if you need us to check for you.
For a continuous monitoring, see also #Details_on_heartbeat_system
Running as a Windows' service, you can check the sending service's status launching get-service-status.bat
Start the application
Once the application is installed:
Double-click ![]() (if you get this message:
(if you get this message: , solve it)
Once the sending service is installed as a Windows' service, use the windows' services app to start it :

Stop the application
hit the keys Ctrl+C
If the sending service is running as a Windows' service, use the windows' services app to stop it :
Administration Interface
New : The former .properties file is no longer a file onto your disk but the data are stored in our database and you can access them through the administration interface.
In the administration interface, you can retrieve all the parameters you can set up. Note that some of them have default values and some are set up when the installation is done. You can make all the changes needed.
Sign in with the sending service account (or as an administrator) and click 
then ![]() , you get :
, you get :

Click the name of the sending service to change, click ![]() to go back to the list.
to go back to the list.

To change a value, click ![]() , make your changes then save or discard.
, make your changes then save or discard.
![]()
The ‘edit all workflows’ button, allow you to make massive changes in one shot.
Once the changes saves, you will get: 
The buttons ![]() , respectively exporting/importing the properties to/from .json format : to backup, to move from UAT to production or to import manual changes onto properties.
, respectively exporting/importing the properties to/from .json format : to backup, to move from UAT to production or to import manual changes onto properties.
Note
- the automatic update set up:
![]()
This is related to the sending service’s version delivered by our IT team. Click the icon to change the automatic update’s status.
- the categories of parameters:

- the
 button


Details on workflows part
Regarding the workflows, each one takes care of specific reports. You must enable those you want the sending service to send.
For example, to send U11 reports, you must enable the reporting_u workflow, the active box must be ticked, and a folder must be entered, you can keep the default one or change it. The intervalTimeInMinute is the frequency with which the directory will be scanned.

You can find the reports and their matching sending service workflow in our product coverage page.
Details on heartbeat system
The heartbeat is a monitoring system to check whether the sending service is still up or not. It pings the sending service at the chosen frequency and send an alert e-mail if the sending service doesn’t answer.
In the ‘properties’ category, you can set it up or down by ticking the box or not, and choose the frequency or the monitoring.

In the ‘Heartbeat’ section, you can find statistics on heartbeat running and you can choose who will receive an alert e-mail when needed.

Manual installation using command prompt
Step 1: Stop the former instance
Be sure that no former instance of the sending service is running on the same environment. If so, stop it.
If you install to replace the version with java, plan to use a new directory.
Step 2: Download the launcher.
The official version is always on the production site. You will be asked for homologation or production environment during the installation process.
To monitor and manage the properties, use the administration module on the relative website.
Connect to www.e-file.lu as the sending service (or as an administrator).
In the administration module, Sending service management – v2:

Click:

The launcher will be downloaded into your default folder:

An alternative is to use this direct link, after logging into e-file :https://www.e-file.lu/fsq-graph/file/download/launcher-version/download?distribution=WINDOWS
Step 3: Install the new Sending Service with the launcher
copy launcher.exe
into the folder where you want to install the sending service
Open launcher.exe
Double-click it ![]() (if you get this message:, solve it)
(if you get this message:, solve it)
You will be asked:
Enter Y (yes) or N (no) for the question: Are you using a proxy?
![]()
Enter the environment: PRODUCTION or HOMOLOGATION
The name must be entirely typed
![]()
The sending service will be downloaded, wait a little.

Enter username
Enter the sending service’s account user name (the one usually ended by ...SD)
Enter the username password
Either: it is not the first installation : a properties file is found on the server
When you have already done an installation in the past, even if you have deleted it on your workstation, your previous setup is saved on our servers. So you will be asked if you want to overwrite it :
Enter N (no) for the question: overwrite the existing properties config file, if you want to keep the previous setup.
Enter the password of your keystore.
Or: If no properties file is found on the server OR you want to overwrite the existing one
Enter Y (yes) for the question: overwrite the existing properties config file.
![]()
Then you will be asked :
- Enter the root folder
- It is the folder where you want the sending service to be installed: it must already exist.
- Entering none will take the current one.
- It is in this folder that the tree structure of sending folders will be generated. After that, for each upload there will be a concatenation between the root folder and the subfolder for each workflow. For example Let's take the rootFolder: "C:\NewSendingService" and the folder for the Key Investor Document "sendingservice/fundregistration/luxembourg/opc". The service will then fetch the documents with the path "C:\NewSendingService\sendingservice\fundregistration\luxembourg\opc". Be careful not to put an \ at the end of the specified path
- Enter the configuration name
- Choose a name for your setup.
- Enter your keystore file path (optional).
- Please note that you must enter your keystore to transmit to Luxembourg authorities.
- Enter Authentication CSSF (optional)
- This is used for O4.1 and O4.2 reports only.
- Enter Authentication BCL (optional)
- This is used for O4.1 and O4.2 reports only.
- Enter the password (optional)
- This is used for O4.1 and O4.2 reports only.
- Enter authentication code (optional)
- This is used for O4.1 and O4.2 reports only.
- Enter Y (yes) or N (no) for the question: Do you want to close the app after installation ?
- Yes means that only the installation will be done.
- No means that the sending service itself will be run after the installation and starts to file reports.
The process will continue, installing all the xsd files …
You can close the window, click the right-corner red cross.
Update the sending service
Change your setup
To change the sending service's setup: workflows; heartbeat, ... and also groups and permissions
- use the administration interface
- then stop the application and start it again.
To change only the proxy setup
- In the folder .\system\config, delete the proxy-conf.json
- then stop the application
- On the root folder, launch launcher again, keep the existing properties config file.
- If you want to use the Windows' service, exit launcher (Ctrl+C) and restart.
To change only one or several passwords
Note that the passwords are encrypted and asked just one time at the first installation. If you have to change them, you must install the whole application again :
- In the folder .\system\config, delete all the .json files (you can keep the proxy-conf.json and the environment.json files if they won't change)
- then stop the application
- On the root folder, launch launcher again, keep the existing properties config file.
- If you want to use the Windows' service, exit launcher (Ctrl+C) and restart.
Upgrade the application
Automatic upgrade
This feature concerns the application updates affecting the sending service (SD) itself and that are applicable to all clients / users.
Short description:
Whenever the sending service starts, restarts, and every 30 minutes when it is up and running, it will check for updates. If an update is detected, and automatic update is selected (you can modify the value in the admin module page), the SD will stop the current process, reinstall the new version and rerun the process automatically. After a successful (or unsuccessful) update a notification will be sent per email.
If the client did not subscribe for automatic application updates and a new version of SD is available, an email will be sent to the client requesting them to update the SD. The client will then have to rerun the application and install the new version.
If the client does not update its SD in a specific timeframe, the sending service will stop running until it has been updated.
Manual upgrade
When a new version is available from out IT team: stop the application then start it again through the launcher.exe.
Submit a report
To send a report just copy it in the relevant folder depending on its type.
See the default sending folders tree:

You can relocate this folders tree to adapt it to your needs, using the administration interface to change the setup.
Then either enter root folder + relative tree folder path or empty root folder and enter an absolute path for the listener :

Default Sending Folders
Scroll this list to find the sending type you need and where you must copy your reports for them to be processed:
| Sending type / type d'envoi | To be copied into / à déposer dans |
|---|---|
| 08/371 FIS Prospectus | sendingservice/fundregistration/luxembourg/fis |
| 08/371 FIS Reports | sendingservice/fundregistration/luxembourg/fis |
| Non-LU UCI Registration | sendingservice/fundregistration/luxembourg/fundsnotlu |
| Other closing docs of GFI | sendingservice/fundregistration/luxembourg/gfi |
| Management letters of GFI | sendingservice/fundregistration/luxembourg/gfi |
| Fin rep of GFI | sendingservice/fundregistration/luxembourg/gfi |
| Key Investor Document | sendingservice/fundregistration/luxembourg/opc |
| Management letters for CSSF 09/423 | sendingservice/fundregistration/luxembourg/opc |
| CSSF Attestation | sendingservice/fundregistration/luxembourg/opc |
| Management regulation status | sendingservice/fundregistration/luxembourg/opc |
| Notification Full | sendingservice/fundregistration/luxembourg/opc |
| Long forms for CSSF 09/423 | sendingservice/fundregistration/luxembourg/opc |
| 08/371 UCI Prospectus | sendingservice/fundregistration/luxembourg/opc |
| 08/371 Report | sendingservice/fundregistration/luxembourg/opc |
| 08/371 report not in 08/371 | sendingservice/fundregistration/luxembourg/other |
| BCL report for insurances | sendingservice/regulatoryreporting/luxembourg |
| BCL SHS | sendingservice/regulatoryreporting/luxembourg |
| AIF Reporting | sendingservice/regulatoryreporting/luxembourg |
| Reporting_s112-l | sendingservice/regulatoryreporting/luxembourg |
| MIFIR reporting | sendingservice/regulatoryreporting/luxembourg |
| Reporting U | sendingservice/regulatoryreporting/luxembourg |
| Reporting EDIFACT | sendingservice/regulatoryreporting/luxembourg |
| Reporting IORP | sendingservice/regulatoryreporting/luxembourg |
| Reporting CSDR | sendingservice/regulatoryreporting/luxembourg |
| FATCA Report | sendingservice/regulatoryreporting/luxembourg |
| CRS Report | sendingservice/regulatoryreporting/luxembourg |
| FINREP | sendingservice/regulatoryreporting/luxembourg |
| SICAR Reporting | sendingservice/regulatoryreporting/luxembourg |
| PSF Report | sendingservice/regulatoryreporting/luxembourg |
| COREP Report | sendingservice/regulatoryreporting/luxembourg |
| EME Report | sendingservice/regulatoryreporting/luxembourg |
| EDP Report | sendingservice/regulatoryreporting/luxembourg |
| Credit institution reporting | sendingservice/regulatoryreporting/luxembourg |
| Management company report | sendingservice/regulatoryreporting/luxembourg |
| Reporting Money Market Fund | sendingservice/regulatoryreporting/luxembourg |
| CSSF enquiry | sendingservice/regulatoryreporting/luxembourg |
| TAF MIFID Report | sendingservice/regulatoryreporting/luxembourg |
| Rapport distinct solvabilité 2 du réviseur | sendingservice/regulatoryreporting/luxembourg |
| Distinct solvency company Report | sendingservice/regulatoryreporting/luxembourg |
| Rapport Narratif (Réviseur) | sendingservice/regulatoryreporting/luxembourg |
| Rapport Narratif (compagnie) | sendingservice/regulatoryreporting/luxembourg |
| Solvency II reporting | sendingservice/regulatoryreporting/luxembourg |
| Titrisation Vehicles | sendingservice/regulatoryreporting/luxembourg |
| Reporting TPT | sendingservice/regulatoryreporting/luxembourg |
| Reporting securities by securities of issuing companies | sendingservice/regulatoryreporting/luxembourg |
| Issuing companies reporting | sendingservice/regulatoryreporting/luxembourg |
| Payment’s balance | sendingservice/regulatoryreporting/luxembourg |
| AnaCredit | sendingservice/regulatoryreporting/luxembourg |
| Security by Security banks | sendingservice/regulatoryreporting/luxembourg |
| BCL statistics | sendingservice/regulatoryreporting/luxembourg |
| Data payment collection | sendingservice/regulatoryreporting/luxembourg |
| Reporting S | sendingservice/regulatoryreporting/luxembourg |
| Various correspondence (OTH) | sendingservice/regulatoryreporting/luxembourg/otherbcl |
| Other reporting for CSSF | sendingservice/regulatoryreporting/luxembourg/othercssf |
| Reporting O | sendingservice/regulatoryreporting/luxembourg/reporting_o |
Check for acknowledgment and feedbacks
Once a report is sent, it is renamed as .trt and move into an auto-generated subfolder called reporttransmitted, a file with extension .acq is also created as an acknowledgement.

If an error occurs, you get a file with extension .err. Open it and read the messages.
The feedbacks from the authority will come into feedbacks. Remember to read them.
Transmission following
Here are the default transmission follow up files that are created depending on the state in the transmission workflow.
| File extension | Description |
|---|---|
| .trt |
Example : file processing of FileName.ext Once the file has been dropped into the appropriate folder, the Sending Service will start processing it and rename it as follows: FileName.ext_YYYYMMDDhhmmssmmm.trt |
| .acq |
Once the processing finished an .acq file will be generated in the same folder by the Sending Service in order to confirm the transmission: FileName.ext_YYYYMMDDhhmmssmmm.acq |
| .err |
An .err file is created in case or an error: FileName.ext_YYYYMMDDhhmmssmmm.err Please open this file and analyse the error message. |
Feedback files (Replies folder)
For some reporting, the administration will give you a more detailed feedback. The feedbacks from the authority will come into feedbacks.
By default, feedback files are dropped into Replies sub-folders. Replies folders are created dynamically in the initial transmission folder of the files. They only appear when feedback files, sent by the supervisory authorities, have to be stored. If the folder is deleted, it will be automatically recreated upon receipt of new feedback files.
The name and location of the Replies folder may be configured differently from the implementation of the solution with your company’s project coordinator
| Autority | Description |
|---|---|
| CSSF |
Feedback files generated and sent by the CSSF. Please click the picture below to access the Naming convention for CSSF reportings document:
|
| BCL |
Feedback files generated and sent by the BCL. The BCL sends feedback with the following naming convention : FDBTECH_[OK/KO]_[YYYYMMDD]_[SENT FILE NAME]_[RANDOM CARACTERS].xml With
|

For other reporting (08/371 / VNI...), there is no additional acknowledgment.
This means that only acq will be created.
Conclusion : Checking that both trt and acq files were generated is a good way to ensure the good working of the Sending Service. Doing this way, you can be sure that your data was properly sent and e-file will be in charge of forwarding them to authorities.
Solving known problems
- If you get this when double-clicking the launch.exe :
Right-click the launch.exe file, then tick unblock : 
Or
click the address bar in the file explorer: ![]()
![]()
type cmd,  then type launcher
- Sometimes in console mode, the process seems to be blocked :

First try to hit Enter or space.
If it is still blocked, you must stop it (CTRL+C) and restart it.
- Error message when installing :

Hit Enter twice, the program will ask for the username again, and go on.
- Error message after stop and start (401):

The sending service password may have changed. You must install it again.
- Setup changes not applied despite being saved
After each change through the administration module, please stop and start the sending service again.