Difference between revisions of "ReportGeneration"
(→Form) |
|||
| (16 intermediate revisions by the same user not shown) | |||
| Line 6: | Line 6: | ||
Our Report Generator generates your XML reporting using the data from your form you completed before. | Our Report Generator generates your XML reporting using the data from your form you completed before. | ||
=Select Test or Production environment= | =Select Test or Production environment= | ||
| Line 39: | Line 36: | ||
Click on the '''Report Generation''' icon. | Click on the '''Report Generation''' icon. | ||
[[File: | [[File:Report_generation.png]] | ||
=Select your report type= | =Select your report type= | ||
| Line 59: | Line 56: | ||
=Form= | =Form= | ||
[[File:Final | [[File:Final U11Form_v2.png|800 px]] | ||
<span style="background:yellow"> '''A'''</span> '''New warning''': no auto saving. | <span style="background:yellow"> '''A'''</span> '''New warning''': no auto saving. | ||
| Line 68: | Line 65: | ||
<span style="background:yellow"> '''D'''</span> '''Icons''' to select Report status. | <span style="background:yellow"> '''D'''</span> '''Icons''' to select Report status. | ||
<span style="background:yellow"> '''F'''</span> '''Select an existing report''' button: This button allows you to upload an existing '''XML''' report from your network or hard-drive into the report generator. | <span style="background:yellow"> '''F'''</span> '''Select an existing report''' button: This button allows you to upload an existing '''XML''' report from your network or hard-drive into the report generator. | ||
| Line 97: | Line 92: | ||
= File transmission = | = File transmission = | ||
Step 1: | Step 1: Once the form is completed, click the '''Transmit''' button. | ||
[[File:AfterU11GreenTicks.png|500 px]] | [[File:AfterU11GreenTicks.png|500 px]] | ||
'''Result:''' | '''Result:''' The REPORT TRANSMISSION window opens. | ||
Step 2: Configure the REPORT TRANSMISSION when it is used for the first time (or after each certificate update). | |||
[[File: | [[File:REPORT TRANSMISSION configure.png | border]] | ||
<span style="background:yellow"> '''a)'''</span> Under the sub-menu <span style="color: #8fbc8f">'''Configuration'''</span>, the path to the keystore should be selected using the button BROWSE FILES or via Drag&Drop. | |||
<span style="background:yellow"> '''b)'''</span> Make sure to select “Save keystore settings” so that the file is memorized by the application. | |||
Step 3: Fill in the TRANSMISSION SETTINGS and Transmit | |||
[[File:REPORT TRANSMISSION transmission.png | border]] | |||
<span style="background:yellow"> '''a)'''</span> Activate the <span style="color: #8fbc8f">'''Transmission'''</span> sub-menu. | |||
<span style="background:yellow"> '''b)'''</span> Enter a “Title of the sending”. | |||
<span style="background:yellow"> '''c)'''</span> Enter the Keystore password. | |||
<span style="background:yellow"> '''d)'''</span> Click “TRANSMIT” to submit your report. | |||
'''Result:''' A pop-up window will confirm the transmission. | |||
[[File: | [[File:REPORT TRANSMISSION confirm.png | border]] | ||
'''Note:''' The file name is automatically generated and compliant to the supervisory authority's file naming convention. | |||
| Line 175: | Line 147: | ||
== File transmission follow-up == | == File transmission follow-up == | ||
PLEASE CONSULT OUR WIKIPAGE [[Transmission | PLEASE CONSULT OUR WIKIPAGE [[Transmission Monitoring|Transmission Monitoring]] | ||
= List of all reportings that can be created manually with our '''Report generator''' = | = List of all reportings that can be created manually with our '''Report generator''' = | ||
| Line 366: | Line 334: | ||
=Set your download directory= | =Set your download directory= | ||
You can set your default download directory | You can set your default download directory.</br> | ||
The set-up depends of your Web browser. | The set-up depends of your Web browser. | ||
| Line 396: | Line 364: | ||
== | == Edge == | ||
See: [https://support.microsoft.com/en-us/microsoft-edge/change-the-downloads-folder-location-in-microsoft-edge-4049e93b-0ef6-e44f-aca0-7d5f37a39294 Change download location on Edge by Microsoft] | |||
Latest revision as of 12:08, 14 September 2023
Introduction
Our Report Generator generates your XML reporting using the data from your form you completed before.
Select Test or Production environment
Production environment : https://www.e-file.lu
Homologation environment (Test) : https://homologation.e-file.lu
E-file login
Enter your e-file login credentials (user name and password) and click the Access button
IMPORTANT: If you do not have an e-file user account, you might contact your e-file administrator of your company.
=>for more detailed information please click the link e-file Administration
E-file launchpad
Once your are logged in, the e-file launchpad opens.
Click on the Report Generation icon.
Select your report type
Please be informed that the PICK A SUB-MODULE functionality did not change in the new e-file version.
Once you have clicked on the Report Generation icon, the window OPEN A SUB-MODULE pops-up. Click on PICK A SUB-MODULE.
A drop-down list opens from which you have to select your reporting type. In our example we will select the U1.1 report.
Then, click on the LAUNCH REPORT button. The U1.1 form opens.
Form
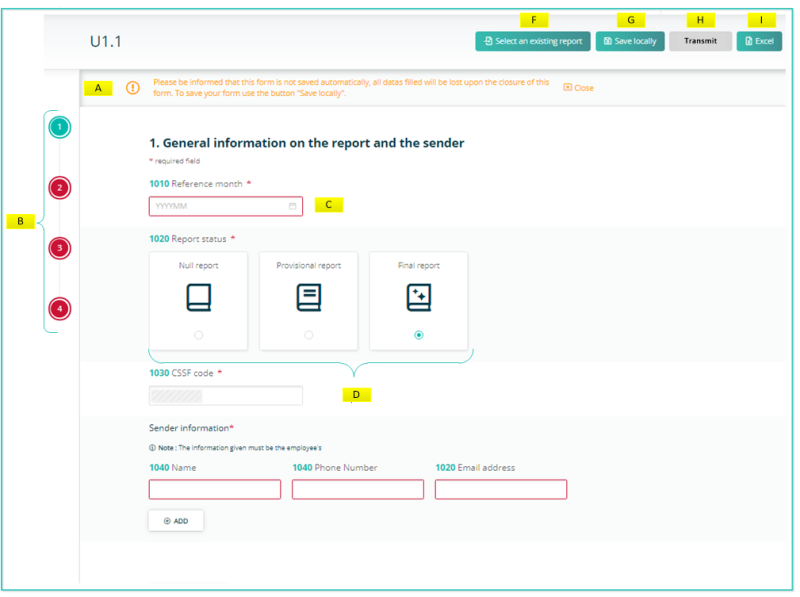
A New warning: no auto saving.
B Vertical navigation bar: pages open vertically. Buttons remain red if data are missing/wrong.
C Calendar to pick the reference date.
D Icons to select Report status.
F Select an existing report button: This button allows you to upload an existing XML report from your network or hard-drive into the report generator.
G Save locally button: Work in progress on a report has to be saved with this button. Work in progress means that the report is not finalized, because important data are missing. The exported .xml file will be called DRAFT_filename.xml and cannot be uploaded for filing. It can be imported onto the tool for later use. If you save locally a final report, meaning that all relevant data are available inside the report, it will carry the correct naming convention for submission to the Regulator.
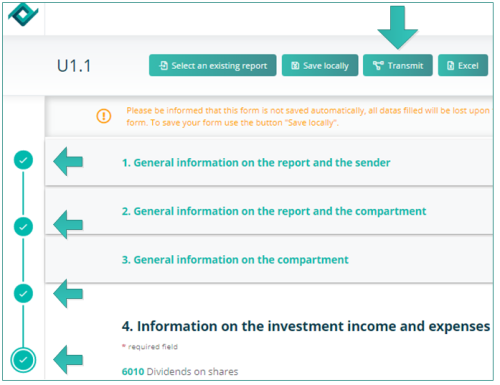
H Transmit button: If the four buttons of the sidebar are green, the Transmission button will become available and the report can be transmitted to the regulator.
I EXCEL button: Press this button to export an uncompleted or finalized report in EXCEL format. This file serves for your internal purpose only, however it cannot be imported.
IMPORTANT INFORMATION on where you can find the item numbers of CIRCULAR CSSF 15/627 U1.1 reporting in the different sections of the form:
![]() 1st button of the sidebar: General information on the report and the sender => item number 1010-1050
1st button of the sidebar: General information on the report and the sender => item number 1010-1050
![]() 2nd button of the sidebar: General information on the report and the compartment => item number 2010-2090
2nd button of the sidebar: General information on the report and the compartment => item number 2010-2090
![]() 3rd button of the sidebar: General information on the compartment => item number 3010-3050
3rd button of the sidebar: General information on the compartment => item number 3010-3050
- Section 1 (sub-section of section 3) General information on the unit/share class => item number 4010-4100
- Section 2 (sub-section of section 3) Financial information on the unit/share class for the reference month => item number 5010-5090
![]() 4th button of the sidebar. Information on the investment income and expenses of the reference month in the fund’s currency => 6010-6100
4th button of the sidebar. Information on the investment income and expenses of the reference month in the fund’s currency => 6010-6100
File transmission
Step 1: Once the form is completed, click the Transmit button.
Result: The REPORT TRANSMISSION window opens.
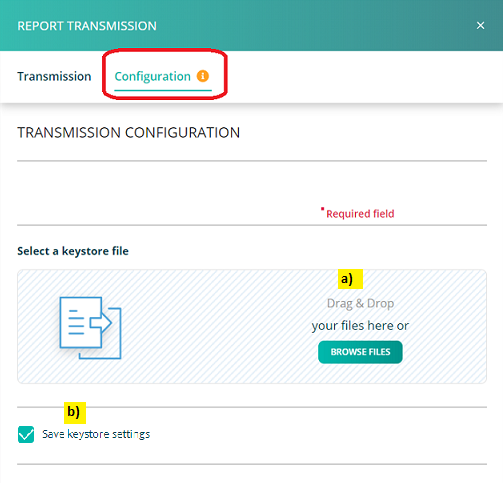
Step 2: Configure the REPORT TRANSMISSION when it is used for the first time (or after each certificate update).
a) Under the sub-menu Configuration, the path to the keystore should be selected using the button BROWSE FILES or via Drag&Drop.
b) Make sure to select “Save keystore settings” so that the file is memorized by the application.
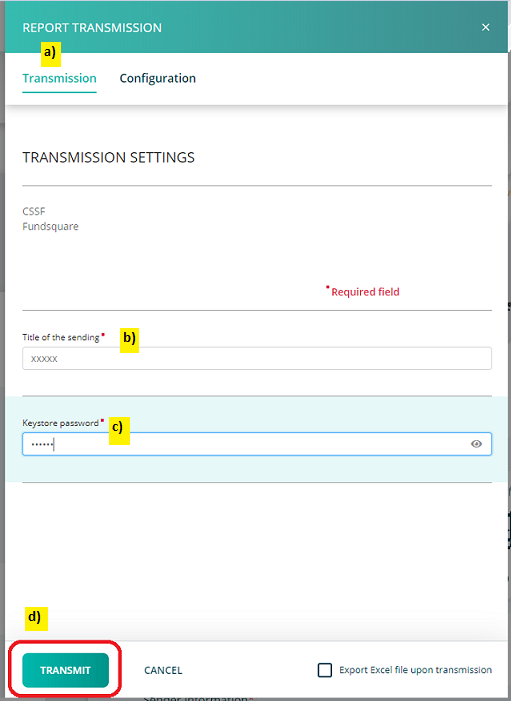
Step 3: Fill in the TRANSMISSION SETTINGS and Transmit
a) Activate the Transmission sub-menu.
b) Enter a “Title of the sending”.
c) Enter the Keystore password.
d) Click “TRANSMIT” to submit your report.
Result: A pop-up window will confirm the transmission.
Note: The file name is automatically generated and compliant to the supervisory authority's file naming convention.
SHOULD YOU ENCOUNTER PROBLEMS PLEASE CONSULT OUR WIKIPAGE SOLVING THE MOST COMMON PROBLEMS OF THE TRANSMISSION MODULE OR CONTACT OUR Client Support & Operations Desk.
File transmission follow-up
PLEASE CONSULT OUR WIKIPAGE Transmission Monitoring
List of all reportings that can be created manually with our Report generator
| Report type | Details | NCA | Reporting population | Fundsquare product catalog reference |
Internal Technical Business ID |
|---|---|---|---|---|---|
| TPTBBL | Security by security report – Balance sheet data–Luxembourg | BCL | Credit Institutions | 2.1.6 | 20 |
| TPTBBN | Security by security report – Balance sheet data – Luxembourg | BCL | Credit Institutions | 2.1.6 | 20 |
| TPTBHR | Security by security report – Off-balance sheet data – Resident customers | BCL | Credit Institutions | 2.1.6 | 20 |
| TPTBHN | Security by security report – Off-balance sheet data – Non-resident | BCL | Credit Institutions | 2.1.6 | 20 |
| O4.1 | Yearly financial information | CSSF | Investment Funds | 1.1 | 8 |
| O4.2 | Interventions on the futures and options markets | CSSF | Investment Funds | 1.1 | 8 |
| O1.2 | Monthly financial information for guaranteed funds | CSSF | Investment Funds | 1.1 | 8 |
| U1.1 | Monthly financial information UCITS and UCI | CSSF | Investment Funds | 1.1 | 8 |
| S1.3 | Monthly statistical balance sheet for money market funds (MMF) | BCL | Investment Funds | 1.1 | 8 |
| S1.6 | Monthly statistical balance sheet for non-money market funds (non-MMF) | BCL | Investment Funds | 1.1 | 8 |
| S2.13 | Quarterly statistical balance sheet for non-MMF investment funds | BCL | Investment Funds | 1.1 | 8 |
| TPTOBS | Monthly Security by security reporting for investment funds | BCL | Investment Funds | 1.1 | 8 |
| S2.14 | Quarterly statistical balance | BCL | Securitisation Vehicles | 2.1.9 | 23 |
| S2.15 | Transactions and write-offs/write-downs on securitised loans | BCL | Securitisation Vehicles | 2.1.9 | 23 |
| TPTTBS | Security by security reporting | BCL | Securitisation Vehicles | 2.1.9 | 23 |
| S2.16 | Quarterly statistical balance of Financial Companies | BCL | Financial Companies | 2.1.12 | 35 |
| S2.17 | Transactions of Financial Companies | BCL | Financial Companies | 2.1.12 | 35 |
| TPTIBS | Monthly security by security reporting of Financial Companies | BCL | Financial Companies | 2.1.12 | 35 |
| S0218-L | Quarterly statistical balance sheet of insurance corporations – Luxembourg entity | BCL | Insurance Corporations | 2.1.21 | 63 |
| S0219-L | Information on valuation effects on the balance sheet of insurance corporations | BCL | Insurance Corporations | 2.1.21 | 63 |
| S0403-L | Annual Premiums, claims and commissions of insurance corporations – Luxembourg entity | BCL | Insurance Corporations | 2.1.21 | 63 |
| TPTASS | Monthly Security by security reporting of insurance corporations | BCL | Insurance Corporations | 2.1.21 | 63 |
| FATCA | Foreign Account Tax Compliance Act Reporting | ACD | Financial Institutions - Foreign Account Tax Compliance Act (FATCA) | (-) 2.1.19 (-) 2.2 |
60 |
| CRS | Automatic exchange of financial account information on a global level | ACD | Financial Institutions - Common Reporting Standard (CRS) | (-) 2.1.22 (-) 2.3 |
68 |
Set your download directory
You can set your default download directory.
The set-up depends of your Web browser.
Google Chrome
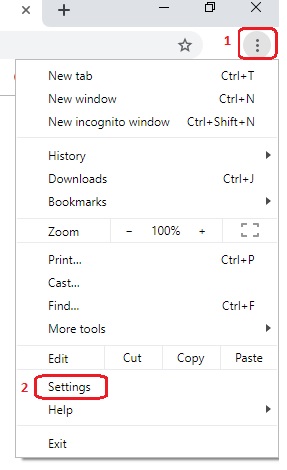
First step, open the settings option :
In Chrome > the 3 points > settings
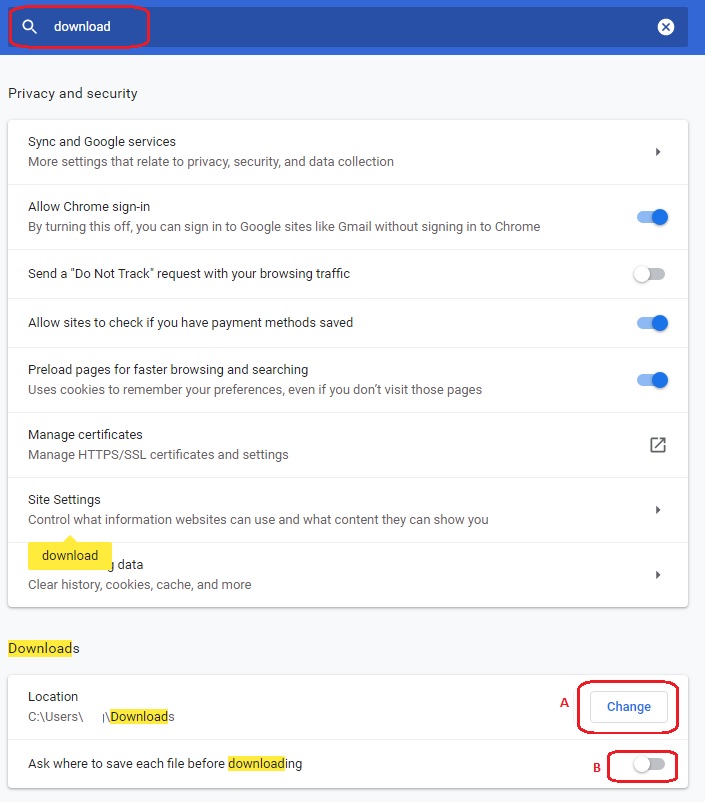
Write download in the search bar
Then two possibilities
- Choose a default directory (A)
- Choose to be asked each time where save the file before downloading (B)
