E-file Administration
e-file FAQ - Administrator's section
Page's last update : 21 Jun 2026
![]()
Knowing the interface
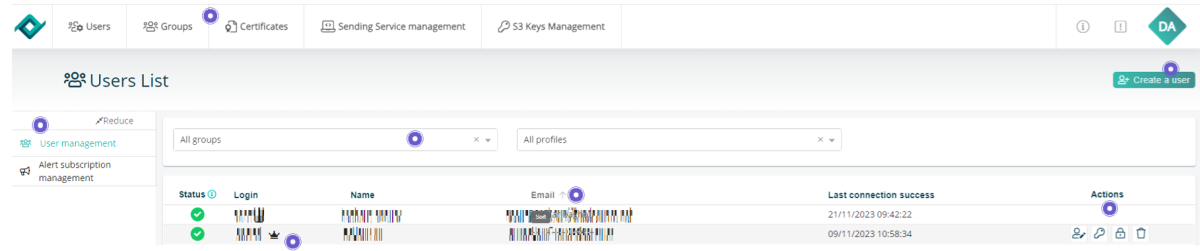
The Administration module opens. Tabs are available in the e-file administrator module: (Figure 3).
.png)
| Users tab | Groups tab | Certificates tab | Sending service tab | S3 keys tab |
|---|---|---|---|---|
|
|
- Explanations
Accounts' management
- You can create as many as users' accounts you need. It is free of charge.
- Enter the administration module
 , you should be on the 'users' tab.
 - Click the Create a user button

.png)
- The Create a user window pops up. Complete the form as shown in the figure below and click the Create button.

- Important note : You do not have to create a password for the user, an automatic mail will be sent to the new user to activate his account and create a password
- The Create a user window closes and you return automatically to the Users List screen.
- At the same time a confirmation window pops up on the top of the screen indicating that the user creation was successful.
.png)
Step 1:
Connect to e-file.lu with your e-file administrator login (adminXXX) and click the Administration module icon.

Step 2:
The Users List screen opens. Click the Edit button on the line of the account to be changed.

Step 3:
Click the detail tab, then Edit button

Step 4: Change the e-mail then click Validate button

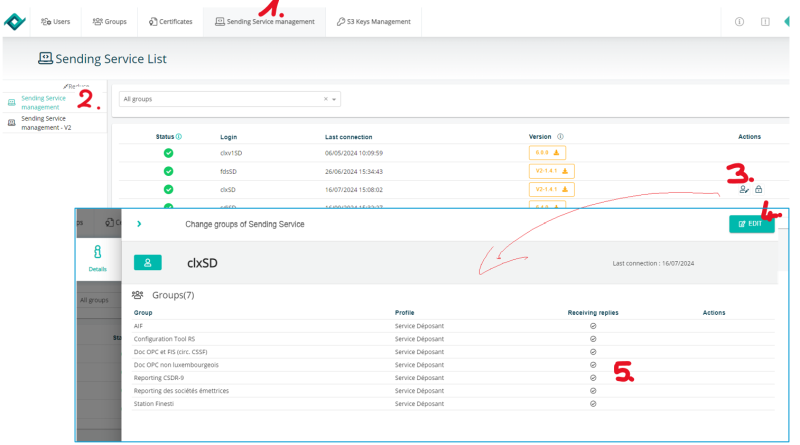
As an administrator, you can manage the permission for the sending service account too. See more information upon the sending service
Groups' management
In e-file, a group allows you to manage permissions for similar reports in terms of type, circulars, costs or technical constraints.
Instead of managing groups for a user, the Groups tab allows you to manage users for a given group.
| Concerned companies | Report naming convention |
Details | Authority | e-file Group | Sending way |
|---|---|---|---|---|---|
| Investment Funds | NOTREP | Notification procedures to be followed by a UCITS governed by Luxembourg law wishing to market its units in another Member State of the European Union | CSSF | (-) Gestion documentaire (-) Dashboard (-) Matrice d'enregistrement et de distribution |
S3 |
| Investment Funds | - | Monthly financial information for guaranteed funds | CSSF | Station Finesti | KS |
| Investment Funds | - | Yearly financial information | CSSF | Station Finesti | KS |
| Investment Funds | - | Interventions on the futures and options markets | CSSF | Station Finesti | KS |
| Investment Funds | S0103 | Monthly statistical balance sheet for money market funds (MMF) | BCL | Station Finesti | KS |
| Investment Funds | S0404 | Country of Marketing | BCL | Station Finesti | KS |
| Investment Funds | S0220 | Quarterly Financial Information | BCL | Station Finesti | KS |
| Investment Funds | TPTOBS | Monthly Security by security reporting for investment funds | BCL | Station Finesti | KS |
| Investment Funds | DOCREP | SIF: (-) Prospectus (PC) (-) Offering document (DE) (-) Letter of explanation (LE) |
CSSF | Doc OPC et FIS (circ. CSSF) | KS |
| Investment Funds | DOCREP | SIF Law 2007: (-) Annual Report (AR) (-) Semi-annual report SIF (SR) (-) Letter of explanation (LE) (-) Other periodic report (RO) (-) Movements in the securities portfolios (PM) SICAR: (-) Annual Report (AR) (-) Other periodic report (RO) |
CSSF | Doc OPC et FIS (circ. CSSF) | KS |
| Investment Funds | DOCREP | Auditor report (-) O: UCI Law 2010 (-) O: UCI Law 2007 (-) K: SICAR (-) S: Investment fund manager (IFM) (-) A: Investment fund manager (IFM) Report Hong Kong Securities and Futures (HK) |
CSSF | Doc OPC et FIS (circ. CSSF) | KS |
| Management Companies | DOCREP | Auditor report (-) S: Investment fund manager (IFM) (-) A: Investment fund manager (IFM) Report Hong Kong Securities and Futures (HK) |
CSSF | Doc OPC et FIS (circ. CSSF) | KS |
| Investment Funds | DOCREP | UCI: (-) Prospectus (PC) (-) Simplified prospectus (PS) (-) Letter of explanation (LE) |
CSSF | Doc OPC et FIS (circ. CSSF) | KS |
| Alternative Investment Fund Managers (AIFM) | AIF | Alternative Investment Fund reporting | CSSF | (-) AIF (-) AMfine |
S3 |
| Alternative Investment Fund Managers (AIFM) | AIF | Alternative Investment Fund reporting (AIF Manager) | CSSF | (-) AIF (-) AMfine |
S3 |
| Credit Institutions | ANTREF ANTT1M ANTT2M ANTT2Q |
AnaCredit: Collection of granular credit and credit risk data |
BCL | Reporting Anacredit | KS |
| Insurance Corporations | S0218-L | Quarterly statistical balance sheet of insurance corporations – Luxembourg entity | BCL | Reporting BCL pour les assurances | KS |
| Insurance Corporations | S0219-L | Information on valuation effects on the balance sheet of insurance corporations | BCL | Reporting BCL pour les assurances | KS |
| Insurance Corporations | S0403-L | Annual Premiums, claims and commissions of insurance corporations – Luxembourg entity | BCL | Reporting BCL pour les assurances | KS |
| Insurance Corporations | TPTASS | Monthly Security by security reporting of insurance corporations | BCL | Reporting BCL pour les assurances | KS |
| Credit Institutions | SHSGRP | «SHS-Group» report: Statistics on holdings of securities by reporting banking groups |
BCL | SHS reporting | KS |
| Credit Institutions | S0001 | Daily deposit | BCL | Statistiques BCL | KS |
| Credit Institutions | S0101 | Monthly statistical balance sheet | BCL | Statistiques BCL | KS |
| Credit Institutions | S0104 | BCL | Statistiques BCL | KS | |
| Credit Institutions | S0105 | Information on interest rates in EUR | BCL | Statistiques BCL | KS |
| Credit Institutions | S0108 | Information on securititation transactions launched by credit institutions |
BCL | Statistiques BCL | KS |
| Credit Institutions | S0109 | Information on CNY (renmibi) operations | BCL | Statistiques BCL | KS |
| Credit Institutions | S0205-L | Quarterly statistical balance sheet | BCL | Statistiques BCL | KS |
| Credit Institutions | S0205-N | Quarterly statistical balance sheet of credit institutions - Luxembourg entity and its branches |
BCL | Statistiques BCL | KS |
| Credit Institutions | S0208 | Real estate loans for Lxuembourg buildings |
BCL | Statistiques BCL | KS |
| Credit Institutions | S0209-L | Staff report - Luxembourg entity |
BCL | Statistiques BCL | KS |
| Credit Institutions | S0209-N | Staff report - Luxembourg entity and its branches |
BCL | Statistiques BCL | KS |
| Credit Institutions | S0302 | Non balance sheet information | BCL | Statistiques BCL | KS |
| Professionals of the Financial Sector (PFS) | COFREP | (-) SMRTLA (EBA V3.0 module mrel_tlac_ind) (-) CMRTLA (EBA V3.0 module mrel_tlac_con) (-) MRTLAX (EBA V3.2 module mrel_tlac) (-) CRESOL until V3.1 (EBA – data : RESOL_CON) (-) SRESOL until V3.1 (EBA – data : RESOL_IND) (-) RESOLX from V3.2 (EBA – data : RESOL_CON and RESOL_IND) (-) CFRXXX based on EBA V3.2 (data : cfr) (-) CIRXXX defined based on EBA V3.2 (data : cir) (-) FMIRXX based on EBA V3.2 (data : fmir) (-) LDRXXX based on EBA V3.2 (data : ldr) |
CSSF | Rapport COREP | KS |
| Credit Institutions | COFREP | (-) SMRTLA (EBA V3.0 module mrel_tlac_ind) (-) CMRTLA (EBA V3.0 module mrel_tlac_con) (-) MRTLAX (EBA V3.2 module mrel_tlac) (-) CRESOL until V3.1 (EBA – data : RESOL_CON) (-) SRESOL until V3.1 (EBA – data : RESOL_IND) (-) RESOLX from V3.2 (EBA – data : RESOL_CON and RESOL_IND) (-) CFRXXX based on EBA V3.2 (data : cfr) (-) CIRXXX defined based on EBA V3.2 (data : cir) (-) FMIRXX based on EBA V3.2 (data : fmir) (-) LDRXXX based on EBA V3.2 (data : ldr) |
CSSF | Rapport COREP | KS |
| Credit Institutions | DOCREP | Audit Report on AML/CTF | CSSF | Reporting des établissements de crédit | KS |
| Credit Institutions | DOCREP | Circ. 18/697 annexe1 | CSSF | Reporting des établissements de crédit | KS |
| Credit Institutions | DOCREP | Annual Report | CSSF | Reporting des établissements de crédit | KS |
| Credit Institutions | DOCREP | Annual report consolidated | CSSF | Reporting des établissements de crédit | KS |
| Credit Institutions | DOCREP | AC Member List | CSSF | Reporting des établissements de crédit | KS |
| Credit Institutions | DOCREP | Compliance Report | CSSF | Reporting des établissements de crédit | KS |
| Credit Institutions | DOCREP | Governance Report | CSSF | Reporting des établissements de crédit | KS |
| Credit Institutions | DOCREP | Internal Audit Report | CSSF | Reporting des établissements de crédit | KS |
| Credit Institutions | DOCREP | ICAAP | CSSF | Reporting des établissements de crédit | KS |
| Credit Institutions | DOCREP | ICAAP Consolidated | CSSF | Reporting des établissements de crédit | KS |
| Credit Institutions | DOCREP | ILAAP | CSSF | Reporting des établissements de crédit | KS |
| Credit Institutions | DOCREP | ILAAP Consolidated | CSSF | Reporting des établissements de crédit | KS |
| Credit Institutions | DOCREP | Long Form Consolidated | CSSF | Reporting des établissements de crédit | KS |
| Credit Institutions | DOCREP | Long Form Branch or Specific Participation | CSSF | Reporting des établissements de crédit | KS |
| Credit Institutions | DOCREP | Long Form Report | CSSF | Reporting des établissements de crédit | KS |
| Credit Institutions | DOCREP | Reconciliation LuxGAAP FINREP | CSSF | Reporting des établissements de crédit | KS |
| Credit Institutions | DOCREP | Management Letter Consolidated | CSSF | Reporting des établissements de crédit | KS |
| Credit Institutions | DOCREP | Audit report on rules of conduct | CSSF | Reporting des établissements de crédit | KS |
| Credit Institutions | DOCREP | Management Letter | CSSF | Reporting des établissements de crédit | KS |
| Credit Institutions | DOCREP | Head quarter annual report | CSSF | Reporting des établissements de crédit | KS |
| Credit Institutions | DOCREP | Risk Control Report | CSSF | Reporting des établissements de crédit | KS |
| Credit Institutions | DOCREP | Report on out-of-court complaint resolution | CSSF | Reporting des établissements de crédit | KS |
| Credit Institutions | DOCREP | Recovery Plan | CSSF | Reporting des établissements de crédit | KS |
| Credit Institutions | DOCREP | Results Distribution | CSSF | Reporting des établissements de crédit | KS |
| Credit Institutions | DOCREP | Single Customer View | CSSF | Reporting des établissements de crédit | KS |
| Credit Institutions | DOCREP | Table on out-of-court complaint resolution | CSSF | Reporting des établissements de crédit | KS |
| Financial Institutions - Common Reporting Standard (CRS) | CRS | Automatic exchange of financial account information on a global level |
ACD | Reporting CRS | KS |
| Credit Institutions | ESPREP | Quarterly reporting on the financial health of the branches parent entities |
CSSF | Enquêtes | KS |
| Credit Institutions | ESPREP | Residential credit deposits | CSSF | Enquêtes | KS |
| Credit Institutions | DCOR | Reporting Entity B: Credit institution |
CSSF | Enquetes | S3 |
| Professionals of the Financial Sector (PFS) | DCOR | Reporting Entity P: PFS |
CSSF | Enquetes | S3 |
| Credit Institutions | ESPREP | Residential real estate market | CSSF | Enquêtes | KS |
| Credit Institutions | ESPREP | Stress test in order to assess the interest rate risk arising from non-trading book activities |
CSSF | Enquête | KS |
| Payment Institutions/Electronic Money Institutions | V0101 | Customer transfers | BCL | Collecte des données de paiement (CDP) | KS |
| Payment Institutions/Electronic Money Institutions | V0110 | Stock taking of payment accounts in bank money | BCL | Collecte des données de paiement (CDP) | KS |
| Payment Institutions/Electronic Money Institutions | V01100 | Payment services provided by e-money institutions and payment institutions without the provision of payment accounts | BCL | Collecte des données de paiement (CDP) | KS |
| Payment Institutions/Electronic Money Institutions | V0111 | OTC cash transactions | BCL | Collecte des données de paiement (CDP) | KS |
| Payment Institutions/Electronic Money Institutions | V01110 | Payment initiation services (payments) | BCL | Collecte des données de paiement (CDP) | KS |
| Payment Institutions/Electronic Money Institutions | V01110-F | Payment initiation services (Fraud) | BCL | Collecte des données de paiement (CDP) | KS |
| Payment Institutions/Electronic Money Institutions | V0112 | Transactions via telecommunication, digital or IT device | BCL | Collecte des données de paiement (CDP) | KS |
| Payment Institutions/Electronic Money Institutions | V0113 | Credits to the accounts by simple book entry | BCL | Collecte des données de paiement (CDP) | KS |
| Payment Institutions/Electronic Money Institutions | V0114 | Debits from the account by simple book entry | BCL | Collecte des données de paiement (CDP) | KS |
| Payment Institutions/Electronic Money Institutions | V0102 | Interbank transfers | BCL | Collecte des données de paiement (CDP) | KS |
| Payment Institutions/Electronic Money Institutions | V0120 | Customer Credit transfers sent (payments) | BCL | Collecte des données de paiement (CDP) | KS |
| Payment Institutions/Electronic Money Institutions | V0120-F | Customer Credit transfers sent (Fraud) | BCL | Collecte des données de paiement (CDP) | KS |
| Payment Institutions/Electronic Money Institutions | V01200 | Stock of issued payment cards | BCL | Collecte des données de paiement (CDP) | KS |
| Payment Institutions/Electronic Money Institutions | V01201 | Stock of distributed payment cards | BCL | Collecte des données de paiement (CDP) | KS |
| Payment Institutions/Electronic Money Institutions | V0121 | Customer credit transfers received | BCL | Collecte des données de paiement (CDP) | KS |
| Payment Institutions/Electronic Money Institutions | V01210 | Stock of terminals by terminal type | BCL | Collecte des données de paiement (CDP) | KS |
| Payment Institutions/Electronic Money Institutions | V01220 | Stock of accounts (except e-money accounts) | BCL | Collecte des données de paiement (CDP) | KS |
| Payment Institutions/Electronic Money Institutions | V01221 | Stock of e-money accounts | BCL | Collecte des données de paiement (CDP) | KS |
| Payment Institutions/Electronic Money Institutions | V01222 | Stock of accessed accounts - account information services (AIS) | BCL | Collecte des données de paiement (CDP) | KS |
| Payment Institutions/Electronic Money Institutions | V01230 | Number of customers | BCL | Collecte des données de paiement (CDP) | KS |
| Payment Institutions/Electronic Money Institutions | V0103 | Domiciliations | BCL | Collecte des données de paiement (CDP) | KS |
| Payment Institutions/Electronic Money Institutions | V0130 | Direct debits - reporting as creditor's PSP (payments) | BCL | Collecte des données de paiement (CDP) | KS |
| Payment Institutions/Electronic Money Institutions | V01300-F | Losses due to fraud per liability bearer | BCL | Collecte des données de paiement (CDP) | KS |
| Payment Institutions/Electronic Money Institutions | V0130-F | Direct debits - reporting as creditor's PSP (fraud) | BCL | Collecte des données de paiement (CDP) | KS |
| Payment Institutions/Electronic Money Institutions | V0131 | Direct debits - reporting as debtor's PSP | BCL | Collecte des données de paiement (CDP) | KS |
| Payment Institutions/Electronic Money Institutions | V0104 | Inventory cards / terminals | BCL | Collecte des données de paiement (CDP) | KS |
| Payment Institutions/Electronic Money Institutions | V0140 | SEPA R-transactions | BCL | Collecte des données de paiement (CDP) | KS |
| Payment Institutions/Electronic Money Institutions | V0141 | Interbank payment transactions | BCL | Collecte des données de paiement (CDP) | KS |
| Payment Institutions/Electronic Money Institutions | V0142 | Intermediated payment transactions | BCL | Collecte des données de paiement (CDP) | KS |
| Payment Institutions/Electronic Money Institutions | V0105 | Card transactiosn (Issuing part) | BCL | Collecte des données de paiement (CDP) | KS |
| Payment Institutions/Electronic Money Institutions | V0150 | Card transactions with cards issued by resident PSPs (payments) | BCL | Collecte des données de paiement (CDP) | KS |
| Payment Institutions/Electronic Money Institutions | V0150-F | Card transactions with cards issued by resident PSPs (fraud) | BCL | Collecte des données de paiement (CDP) | KS |
| Payment Institutions/Electronic Money Institutions | V0151 | Electronic card transactions with cards issued by resident PSPs, split by Merchant Category Codes (MCC) | BCL | Collecte des données de paiement (CDP) | KS |
| Payment Institutions/Electronic Money Institutions | V0152 | Card transactions acquired by resident PSPs (payments) | BCL | Collecte des données de paiement (CDP) | KS |
| Payment Institutions/Electronic Money Institutions | V0152F | Card transactions acquired by resident PSPs (Fraud) | BCL | Collecte des données de paiement (CDP) | KS |
| Payment Institutions/Electronic Money Institutions | V0153 | Fundings and withdrawals related to prepaid cards | BCL | Collecte des données de paiement (CDP) | KS |
| Payment Institutions/Electronic Money Institutions | V0106 | Card transactiosn (Acquiring part) | BCL | Collecte des données de paiement (CDP) | KS |
| Payment Institutions/Electronic Money Institutions | V0160 | Cheques and money remittances (payments) | BCL | Collecte des données de paiement (CDP) | KS |
| Payment Institutions/Electronic Money Institutions | V0160-F | Cheques and money remittances (Fraud) | BCL | Collecte des données de paiement (CDP) | KS |
| Payment Institutions/Electronic Money Institutions | V0107 | Cheques and money orders | BCL | Collecte des données de paiement (CDP) | KS |
| Payment Institutions/Electronic Money Institutions | V0170 | Over-the-counter (OTC) cash transactions | BCL | Collecte des données de paiement (CDP) | KS |
| Payment Institutions/Electronic Money Institutions | V0108 | Electronic money scheme | BCL | Collecte des données de paiement (CDP) | KS |
| Payment Institutions/Electronic Money Institutions | V0180 | Book entries | BCL | Collecte des données de paiement (CDP) | KS |
| Payment Institutions/Electronic Money Institutions | V0109 | Card based e-money schemes | BCL | Collecte des données de paiement (CDP) | KS |
| Payment Institutions/Electronic Money Institutions | V0190 | Fundings and withdrawals in e-money (except prepaid cards) | BCL | Collecte des données de paiement (CDP) | KS |
| Payment Institutions/Electronic Money Institutions | V0191 | E-money transfers (payments) | BCL | Collecte des données de paiement (CDP) | KS |
| Payment Institutions/Electronic Money Institutions | V0191-F | E-money transfers (Fraud) | BCL | Collecte des données de paiement (CDP) | KS |
| Credit Institutions | ESPREP | Fonds de garantie des dépôts Luxembourg (FGDL) |
CSSF | Enquête | KS |
| Payment Institutions | EDPREP | Balance sheet | CSSF | Reporting EDP | KS |
| Payment Institutions | EDPREP | Identification of third-party funds held and incorporated in the balance sheet |
CSSF | Reporting EDP | KS |
| Payment Institutions | EDPREP | Capital adequacy of payment institutions |
CSSF | Reporting EDP | KS |
| Payment Institutions | EDPREP | Profit and loss accoount | CSSF | Reporting EDP | KS |
| Electronic Money Institutions | EMEREP | Balance sheet | CSSF | Reporting EME | KS |
| Electronic Money Institutions | EMEREP | Identification of third-party funds held and incorporated in the balance sheet |
CSSF | Reporting EME | KS |
| Electronic Money Institutions | EMEREP | Statement of authorised reinvestments |
CSSF | Reporting EME | KS |
| Electronic Money Institutions | EMEREP | Capital adequacy of electronic money institutions |
CSSF | Reporting EME | KS |
| Electronic Money Institutions | EMEREP | Profit and loss account | CSSF | Reporting EME | KS |
| Electronic Money Institutions | EMEREP | Analysis of shareholdings | CSSF | Reporting EME | KS |
| Financial Institutions - Foreign Account Tax Compliance Act (FATCA) | FATCA | Foreign Account Tax Compliance Act Reporting | ACD | Groupe FATCA | KS |
| Management Companies | DOCREP | (-) Letter of explanation (LE) |
CSSF | Doc OPC et FIS (circ. CSSF) | KS |
| Management Companies | DOCREP | Annual report of Investment fund managers (IFM) (EN) Gestionnaires des fonds d'investissement (GFI) (FR) |
CSSF | Doc OPC et FIS (circ. CSSF) | KS |
| Credit Institutions | FRCREP | Information on participating interest and subordinated loans |
CSSF | Rapport FINREP | KS |
| Credit Institutions | FRCREP | Information on staff costs and taxes and subordinated loans |
CSSF | Rapport FINREP | KS |
| Credit Institutions | CFEREP | LCRDAX | CSSF | Rapport FINREP | S3 |
| Financial Companies | S0216 | Quarterly statistical balance of Financial Companies | BCL | Reporting des sociétés émettrices | KS |
| Financial Companies | S0217 | Transactions of Financial Companies | BCL | Reporting des sociétés émettrices | KS |
| Investment Funds | DOCREP | Key Investor Information Document (-) O: OPC Law 2010 and Loi 2007 (-) K: SICAR (-) V: non-reglem. |
CSSF | Doc OPC et FIS (circ. CSSF) | S3 |
| Investment Funds | DOCREP | Long Form reports (UCI Law 2010) | CSSF | Doc OPC et FIS (circ. CSSF) | KS |
| Management Companies | SGOREP | (-) SG 1A: Financial situation (-) SG 1B: Profit and loss account (-) SG 1C: Table relating to other activities (-) SG 2: Other activities (-) SG: Personnel Table relating to staff |
CSSF | Rapport Société de Gestion | KS |
| Investment Funds | DOCREP | Management letters (-) O: OPC Law 2010 (-) O: Law 2007 (-) K: SICAR |
CSSF | Doc OPC et FIS (circ. CSSF) | KS |
| Investment Funds | DOCREP | Management letters of Investment fund managers (IFM) (EN) Gestionnaires des fonds d'investissement (GFI) (FR) |
CSSF | Doc OPC et FIS (circ. CSSF) | KS |
| Investment Funds | DOCREP | Articles of Incorporation of UCITS (-) O: UCI Law 2010 (-) O: UCI Law 2007 (-) K: SICAR |
CSSF | Doc OPC et FIS (circ. CSSF) | S3 |
| Investment Funds | DOCREP | Management Regulations of UCITS (-) O: OPC Law 2010 (-) O: Law 2007 |
CSSF | Doc OPC et FIS (circ. CSSF) | S3 |
| MiFID II / MiFIR | TAFREP | Article 26 of Regulation No 600/2014: Obligation to report transactions (Markets in financial instruments => MiFIR) |
CSSF | Report TAF-MIFID | KS |
| Management Companies | DOCREP | Investment fund managers (IFM): (-) Risk management function(GR) (-) OPCVM instruments information (ID) (-) Compliance Function (FC) (-) Internal audit function report (IA) (-) Complaints handling (TP) (-) Authorized third party complaints (LP) (-) Risk Management Procedure (PG) (-) Organization chart (OG) (-) Mandates table (TM) (-) Delegates of RFI (RD) (-) Branch activity (AS) (-) Own funds ratio (FP) (-) Risk management procedure AIFM (PN) |
CSSF | Doc OPC et FIS (circ. CSSF) | KS |
| Other reporting CSSF BCL | OTHREP | Other reporting | CSSF | Reporting OTHER (CSSF) | KS |
| Credit Institutions | BOP101 | Balance of payments reporting | BCL | Balance des Paiements | KS |
| Credit Institutions | BOP102 | Cross-border payments executed for the account of the resident counterparts |
BCL | Balance des Paiements | KS |
| Professionals of the Financial Sector (PFS) | PSFREP | Reporting population: (-) Investment firms (-) Specialised PFS (-) Support PFS |
CSSF | Rapport PSF | KS |
| Insurance Corporations | N01 (Comp); N02 (Comp); N03 (Comp); N04 (Comp); N05 (Réviseur); N06( Réviseur); N07 (Comp); N08 (Comp); N09 (Comp); N10 (Comp); N11 (Comp); N12 (Réviseur); N13 (Comp); N14 'Comp) |
Rapports narratifs | CAA | Groupe CAA | KS |
| Credit Institutions | CSDREP | Reporting CSDR: Introduction of quarterly internalised settlement reporting requirements pursuant to Article 9(1) of EU Regulation No 909/2014 (CSDR) |
CSSF | Reporting CSDR-9 | KS |
| Credit Institutions | BNNNN | List of head offices, agencies, branches and representative offices |
CSSF | Reporting EDIFACT | KS |
| Institutions for Occupational Retirement Provision | SUFREP | Annual and quarterly reporting according to Circular CSSF 19/726 of 26 July 2019 | CSSF | Reporting IORP | KS |
| Money Market Funds (MMF) | MMFREP | • According to Article 37 of Regulation (EU) 2017/1131, the manager of a MMF must report information to the competent authority (CSSF) of the MMF, at least on a quarterly basis or - for MMF with assets under management of less than Eur 100 million - on at least an annual basis. • The first quarterly report should be sent to the competent authority of the MMF no later than 30 days after the end of Q1 2020. |
CSSF | Money market fund reporting | KS |
| Credit Institutions | S0112-L | Indirect withdrawal and remittance of banknotes denominated in EUR through an intermediary | BCL | Reporting S1.12 | KS |
| Financial Companies | TPTIBS | Monthly security by security reporting of Financial Companies | BCL | Reporting des sociétés émettrices | KS |
| Investment Funds | U11 | Monthly financial information UCITS and UCI | CSSF | Station Finesti | KS |
| Credit Institutions | TPTBBL | Security by security report– Balance sheet data– Luxembourg |
BCL | Titre par Titre Bancaire | KS |
| Credit Institutions | TPTBBN | Security by security report– Balance sheet data– Luxembourg |
BCL | Titre par Titre Bancaire | KS |
| Credit Institutions | TPTBHN | Security by security report– Off-balance sheet data– Non-resident |
BCL | Titre par Titre Bancaire | KS |
| Credit Institutions | TPTBHR | Security by security report– Off-balance sheet data– Resident customers |
BCL | Titre par Titre Bancaire | KS |
| Investment Funds | SFDR | Reporting Entity (-) O: UCI Law 2010 (-) O: UCI Law 2007 (-) K: SICAR (-) F: Pension Fund |
CSSF | SFDR reporting | S3 |
| Investment Funds | SFDR | Reporting Entity (-) O: UCI Law 2010 (-) O: UCI Law 2007 (-) K: SICAR (-) F: Pension Fund |
CSSF | SFDR reporting | S3 |
| Investment Funds | SIC | Financial information to be submitted by investment companies in risk capital (SICARs) | CSSF | Reporting SICAR | KS |
| Investment Funds | DOCREP | UCI Law 2010: (-) Annual Report (AR) (-) Semi-annual report (SR) (-) Letter of explanation (LE) (-) Other periodic report (RO) (-) Movements in the securities portfolios (MP) |
CSSF | Doc OPC et FIS (circ. CSSF) | KS |
| Insurance Corporations | S01; S02; S03; S04; S05; S06 (Réviseur); S07; S08; S09; S10; S11; S12; S13; S14; S15; S16; S17; S18; S19; S20; S23 |
XBRL reports Solvency II | CAA | Reporting CAA | KS |
| Securitisation Vehicles | S0214 | Quarterly statistical balance | BCL | Véhicule titrisation | KS |
| Securitisation Vehicles | S0215 | Transactions and write-offs/write-downs on securitised loans | BCL | Véhicule titrisation | KS |
| Securitisation Vehicles | TPTTBS | Security by security reporting | BCL | Véhicule titrisation | KS |
| Alternative Investment Fund Managers (AIFM) | UCIAR | Reporting Entity A: Alternative Investment fund manager (AIFM) |
CSSF | (-) UCIAR reporting | KS |
| Credit Institutions | UCIAR | Reporting Entity B: Credit institution |
CSSF | (-) UCIAR reporting | KS |
| Investment Funds | UCIAR | Reporting Entity (-) O: UCI Law 2010 (-) O: UCI Law 2007 (-) K: SICAR |
CSSF | (-) UCIAR reporting | KS |
| Management Companies | UCIAR | Reporting Entity S: Management company |
CSSF | (-) UCIAR reporting | KS |
| Professionals of the Financial Sector (PFS) | UCIAR | Reporting Entity (-) P: PFS (-) I: Support PFS |
CSSF | (-) UCIAR reporting | S3 |
| Other reporting CSSF BCL | OTXREP | Various correspondence | BCL | Reporting OTHER (BCL) | KS |
| Investment Funds | DOCREP | Investment fund managers (IFM): (-) Risk management function(GR) (-) OPCVM instruments information (ID) (-) Compliance Function (FC) (-) Internal audit function report (IA) (-) Complaints handling (TP) (-) Authorized third party complaints (LP) (-) Risk Management Procedure (PG) (-) Organization chart (OG) (-) Mandates table (TM) (-) Delegates of RFI (RD) (-) Branch activity (AS) (-) Own funds ratio (FP) (-) Risk management procedure AIFM (PN) |
CSSF | Doc OPC et FIS (circ. CSSF) | KS |
| Credit Institutions | SPJ | Notification and execution of court orders | SPJ | Perquisitions électroniques | KS |
| Investment Funds | DOCREP | Investment fund managers (IFM) (EN) Gestionnaires des fonds d'investissement (GFI)(FR) (-) Annual Report (AR) (-) Other periodic report (RO) |
CSSF | Doc OPC et FIS (circ. CSSF) | KS |
| Credit Institutions | CFEREP | ALMXXX | CSSF | Rapport COREP | S3 |
| Professionals of the Financial Sector (PFS) | DOCREP | Long Form Report | CSSF | Rapport des établissements de crédit | KS |
| Management Companies | DOCREP | Management letters of Investment fund managers (IFM) (EN) Gestionnaires des fonds d'investissement (GFI) (FR) |
CSSF | Doc OPC et FIS (circ. CSSF) | KS |
| Professionals of the Financial Sector (PFS) | DOCREP | Management Letter | CSSF | Rapport des établissements de crédit | KS |
| Investment Funds | S0106 | Monthly statistical balance sheet for non-money market funds (non-MMF) | BCL | Station Finesti | KS |
| Investment Funds | S0213 | Quarterly statistical balance sheet for non-MMF investment funds | BCL | Station Finesti | KS |
| Insurance Corporations | CED | Etat de situation relatif aux contrats en déshérence | CAA | Reporting CAA | KS |
| Insurance Corporations | CPR | Compte rendu | CAA | Reporting CAA | KS |
| Insurance Corporations | ESP | Enquête spécifique | CAA | Reporting CAA | KS |
| Insurance Corporations | ETR | Etat trimestriel | CAA | Reporting CAA | KS |
| Insurance Corporations | FIR | Fiche de renseignement | CAA | Reporting CAA | KS |
| Insurance Corporations | PDA | Rapport PDAL (Procédure de Dissolution Administrative sans Liquidation) | CAA | Reporting CAA | KS |
| Insurance Corporations | RAC | Rapport actuariel | CAA | Reporting CAA | KS |
| Insurance Corporations | RDC | Rapport distinct complémentaire du réviseur | CAA | Reporting CAA | KS |
| Insurance Corporations | RDI | Rapport distinct du réviseur | CAA | Reporting CAA | KS |
| Insurance Corporations | RGO | Rapport de gouvernance | CAA | Reporting CAA | KS |
| Insurance Corporations | RLB | Rapport LBCFT | CAA | Reporting CAA | KS |
| Insurance Corporations | RRE | Rapports sur le traitement des réclamations | CAA | Reporting CAA | KS |
| Insurance Corporations | RSE | Rapport distinct Solvabilité 2 de l'entreprise | CAA | Reporting CAA | KS |
| Insurance Corporations | RSO | Rapport distinct Solvabilité 2 du réviseur | CAA | Reporting CAA | KS |
| Credit Institutions | ICS | Yearly Survey on Covered Investment claims (SIIL) | CSSF | Enquête | S3 |
| Insurance Corporations | ROI DIN |
DORA Register of Information DORA Incident Reporting |
CAA | Groupe CAA | KS |
| Professionals of the Financial Sector (PFS) | DPAAIF | self-assessment questionnaire PDAOFI |
CSSF | PDAOFI reporting | S3 |
| Credit Institutions | CFEREP | (-) ALM corep_alm_con.xsd corep_alm_ind.xsd corep_alm.xsd (-) LCRDA corep_lcr_da_con.xsd corep_lcr_da_ind.xsd corep_lcr_da.xsd (-) IRRBB irrbb.xsd |
CSSF | Rapport COREP | S3 |
If you think that the group you need is not available in your list, please ask us to check and/or add it.
Connect to e-file.lu with your e-file administrator login (adminXXX) and click the Administration module icon (Figure 21).
(Figure 21)
Example:
If you want to know the users to which the group Group FATCA has been assigned or if you want to add a new user to the group, please follow the instructions below.
Step 1:
Press the Groups button. The Groups list page opens. All groups assigned to your company are shown here (Figure 22).

(Figure 22)
Step 2:
Click the Edit groups icon ![]() in order to view all the users assigned to Groupe FATCA group (Figure 23).
in order to view all the users assigned to Groupe FATCA group (Figure 23).

(Figure 23)
The Group detail page opens. Here you can find detailed information on the Group FATCA (e.g. Status date, number of inactive users, number of locked users) (Figure 24).

(Figure 24)
Step 3:
Press the Users button (Figure 25)

(Figure 25)
The Group detail / Users page opens. All users assigned to the Group FATCA are listed here(Figure 26).

(Figure 26)
Step 4:
Press the Edit Users button ![]() (Figure 27)
(Figure 27)

(Figure 27)
The Users page opens in Edit mode (Figure 28)

(Figure 28)
The following actions can be done here:
1. ADD A USER. Select the user and his profile you want to add.
2. Change the Profile of the user
3. Delete the User
4. Once you have made your changes, press the VALDATE CHANGES button ![]()
The Users window closes and you return automatically to the Groups List screen.
At the same time a confirmation window pops up on the top of the screen indicating that the assignment was successful (Figure 29).

(Figure 29)
Example:
If a user has to send FATCA reportings to the authority, the e-file administrator must assign the group Rapport FATCA and the profile Manager to the user.
Step 1:
Open the User management screen in the Users tab and click the Edit ![]() icon of the user to whom you want assign groups and a specific profile (Figure 11).
icon of the user to whom you want assign groups and a specific profile (Figure 11).
.png)
(Figure 11)
Step 2:
The User details screen opens. Click the Groups button (Figure 12).

(Figure 12)
Step 3: The User details / Groups screen opens. Click the Edit button (Figure 13).

(Figure 13)
Step 4:
The User details / Groups screen opens in Edit mode (Figure 14).
Click the ADD A GROUP button ![]() , select the groups and profile you want to assign and click the Validate button.
, select the groups and profile you want to assign and click the Validate button.

(Figure 14)
The User details / Groups window closes and you return automatically to the Groups List screen.
At the same time a confirmation window pops up on the top of the screen indicating that the group assignment was successfully saved (Figure 15).
(Figure 15)
Please be informed that you can find detailed information on all groups on our Wikipage 'e-file Administrator FAQ'; column e-file user account: "groupe".
User profiles
Administrator (EN)/ Administrateur (FR)
The Administrator profile allows the e-file administrator to order and activate LuxTrust certificate(s), manage user accounts, groups, user profiles, lock and un lock user account.
Guest (EN) */ Visiteur (FR) *
- The Guest can consult the information or documents of his affected group(s).
- He can access the follow up tools and open the documents linked to the group(s).
- The Guest cannot submit reports or documents via e-file.
Manager (EN)/ Responsable (FR)
- The Manager can consult the information or documents of his affected group(s).
- He can access the follow up tools and open the documents linked to the group(s).
- The Manager can submit reports linked to his group(s) via e-file.
Operator (EN) */ Opérateur (FR) *
- The Operator can consult the information or documents of his affected group(s).
- He can access the follow up tools and open the documents linked to the group(s).
- The Operator submit reports linked to his group(s) to validation by a Validator.
Validator (EN) */ Valideur (FR) *
- The Validator can consult the information or documents of his affected group(s).
- He can access the follow up tools and open the documents linked to the group(s).
- He validates or rejects reports awaiting for validation linked to his group(s).
(*) Available depending the group
Security's management
* keystore system, Luxtrust certificate, SSL security
You can find a video tutorial here which summarises the below process
Certain reporting files transmitted to the supervisory authorities must be encrypted.
Prior your first filing you will have to order and activate a Luxtrust certificate.
The only certificate authorised for the file encryption by the reporting entity are SSL certificates from the certification authority LUXTRUST.
Please check the system requirements to run the e-file applications.
Key and Certificate Request generation
Please be informed that during the next steps two files will be generated:
1- the keystore file keystore.ks containing your new keys
2- the certificate request file Certificate Request.csr containing a copy of your new keys. This file must be uploaded on LUXTRUST's website during your purchase order .
Important note : the Luxtrust SSL certificate purchase order and its activation have to be performed on the same computer workstation.
Step 1:
Connect to e-file.lu with your e-file administrator credentials (adminXXX) and click the Administration module icon (Figure 30).
![]()
(Figure 30)
Step 2:
Click the Certificates button (Figure 31)

(Figure 31)
Step 3:
The Certificates Management screen opens. Click the CERTIFICATE REQUEST - ACTIVATION MENU link (Figure 32).

(Figure 32)
Result: A new screen opens displaying GENERATE CERTIFICATE KEYS - BEFORE LUXTRUST WEBSITE ORDER on the left side of the page
Step 4:
Configure your keystore (Figure 33).

(Figure 33)
a. Select the keystore import method
If you order the certificate for the very first time , select Create a new keystore file option and indicate a keystore name.
In the case you have to renew your certificate, you must select your curent keystore file by using the browse file or drag & drop feature to import it.
Important note : in both case, the new keystore will be generated in the configured download folder of your Web browser e.g.: C:\Users\xxx\Downloads
- File name: choose your keystore name, for example keystore.ks
- File type : .ks
b. Password
If you order the certificate for the very first time , you have to define a brand-new keystore password. A confirmation is required
In the case you have to renew your certificate, e.g. its validity date expired, you must use the keystore password that had been created when you ordered the certificate for the very first time.
Important note : the keystore password has to be shared with all e-file users who have to transmit encrypted documents or decrypt feedback files received from the supervisory authorities. .
Important note : if you loose your keystore password, you will have to generate a new key and order a new certificate.
c. Certificate request name (.csr)
You have to define a name for the technical certificate request file required by Luxtrust, for example CertificateRequest.csr
Important note : the certificate request will be generated in the configured download folder of your Web browser e.g.: C:\Users\xxx\Downloads.
- File name: CertificateRequest.csr
- File type : .csr
Step 5:
Verify the Company information. (Figure 34) :

(Figure 34)
The related fields will be pre-filled in with information we currently have in our system. Feel free to make changes if necessary.
Step 6:
Click the Generate keys button.
A window will pop up inviting you to download the Keystore file and Certificate Signing Request (Figure 35).

(Figure 35)
You must click on each of the Download buttons in order to activate the OK button.
Then click OK to clear the message window.
Both keystore and certificate request files will be generated in the configured download folder of your Web browser e.g.: C:\Users\xxx\Downloads
Important note : the updated keystore will be generated with a new name as follows:
The name of the previous keystore + a timestamp displayed as yyyymm + onhold.

Example: oldname : MyKeystore.ks / new name : MyKeystore_202212_onhold.ks
Important note : we advise you to back up the keystore.ks and CertificateRequest files.
Finalize your LUXTRUST purchase order
Before to start order in the Luxtrust website make sure that you have process the previous part (Key and Certificate Request generation).
-Open the LUXTRUST easy SSL e-file website.
-Browse to SSL Certificate section and click the E-FILE icon

-Choose the period of validity of your certificate and click the ORDER E-FILE button.
-If you do not have a LUXTRUST easy SSL e-file account you have to get registered.
-Once registered, complete the whole order form, upload your CertificateRequest.csr file, accept the TERMS AND CONDITIONS and click the PLACE ORDER button.
-Shortly afterwards, you will receive an e-mail from LUXTRUST confirming your purchase order.
-Please follow all instructions provided in the e-mail and its PDF attachment (Send signed PDF by post with all required documents to the address indicated inside, process the payment etc.)
The certificate file will be sent to the e-mail address you provided in your purchase order.
The extension of this file will be .txt, in order to prevent your firewall from blocking the attached file.
Step 1:
Important note: save the file .txt on your computer workstation and replace the .txt extension by .cer
Double-click the .cer file. You should be able to see your certificate as shown below (Figure 36):

(Figure 36)
Step 2:
Important note : the Luxtrust SSL certificate ordering and its activation have to be performed on the same computer workstation.
Connect to e-file.lu with your e-file administrator credentials (adminXXX) and click the Administration module icon (Figure 37).
![]()
(Figure 37)
Step 3:
Click the Certificates button (Figure 38).

(Figure 38)
Step 4:
Click the CERTIFICATE ACTIVATION – AFTER RECEPTION OF LUXTRUST CERTIFICATE link (Figure 40).

(Figure 40)
Step 5:
Configure your keystore (Figure 41).

(Figure 41)
a. Select the Group you need to use (by default Principal)
b. Import the keystore that was generated at the same time as the Certificate Signing Request (from previous step )
c. Enter the keystore password
d. Import the certificate you received from Luxtrust
Step 6:
Click the ACTIVATE CERTIFICATE button.
A window will pop up and inform you that the activation has been done successfully.
Your keystore.ks is now updated. It contains your activated LUXTRUST certificate and your encryption keys.

Note: The display and the position of the pop up may differ regarding the Web browser you are using
Important note : the updated keystore will be generated in the configured download folder of your Web browser e.g.: C:\Users\xxx\Downloads.
Important note : the updated keystore will be generated with a new name : the name of the previous keystore + a timestamp displayed as yyyymm + completed.
Example: previous name : MyKeystore.ks / new name : MyKeystore_202212_completed.ks
Important note : if you loose your keystore and/or its password,you will have to generate a new encryption key and order a new certificate. .
Manual file transmission
The activated keystore, containing your LUXTRUST certificate and your encryption keys must now be provided to the workstations of each e-file user.
Step 1:
Open the Transmission module

Step 2:
.PNG)
Automatic file transmission
In the case you are using the Sending Service for automatic file transmission, the activated keystore.ks must be provided as well.
For some reportings, the LUXTRUST e-file SSL certificate used by the reporting entity must be registered with the CSSF, before sending any files, according to the registration procedure described in the CSSF 23/833, naming convention part.
The LUXTRUST e-file SSL certificate must be registered with the CSSF for the below reportings:
(list extracted from Transport et sécurisation via les canaux de transmission externes)
- COREP/FINREP reporting
- ESP – Special enquiries
- SIC – SICAR reporting
- PFS – Reporting PFS and support PFS
- EDP – Payment institutions reporting
- EME – Electronic money institution
- SGO – Management companies reporting
- OPC – Fund XML reporting (O1.2)
- DOC – Non-structured electronic documents (circ. 19/731)
- OTH – Other
- OCB – Other reportings for CSSF and BCL
- SUF – XBRL reportings for subfund-based structured products (IORP)
- O4.x – Edifact report
=> e-file User Guide: CSSF Certificate registration
* S3 system
The CSSF has updated its submission methods to allow AIFMs to file specific regulatory reports via the CSSF’s API from 2nd November.
Please note, this is not the deadline to make the change, it is the point at which the new method is available to use.
FE Fundinfo are ready to support you through the transition.
Your current setup in e-file will remain in place and only minor one-off changes are required from you to ensure the continuation of your existing functionality on e-file and future proof the communication method for all reporting and filing with the CSSF going forward.
Explanation in context of AIFMD reporting:
See our online webinar for more explanations : November 21st webinar in English and the related presentation
Explanation in context of UCITS Cross-Border notification:
See our online webinar for more explanations : December 12th webinar in English and the related presentation
This new system works via a bucket system.
There is one bucket for each filing context (i.e. Cross-border notification, AIFMD)
The CSSF imposes a technical size limit for filing per bucket on 30 rolling days.
Should you encounter any issue, feel free to contact us directly Client Support & Operations Desk we will liaise with the CSSF.
The below is a step-by step guide to appoint FE Fundinfo as a delegate within the CSSF’s eDesk platform, the easiest path to allow us to maintain our services.
Once the set-up is complete you can continue to use your familiar eFile interface and do not need to interact with eDesk as this will all be channelled within your existing workflows in eFile.
To perform the set-up in eFile you have two options:
- You as IT expert import the S3 keys on eFile
| Steps | Actions | Additional information |
|---|---|---|
|
Step 1 |
Your entity’s appointed IT Expert will need to log into the IT Management area of eDesk (here). This must be using the same LuxTrust Device and account that the IT Expert role was assigned to. Please note, that these steps can only be implemented from the appointed IT Expert account |
|
|
Step 2 |
Once logged in, go to the ‘S3 ACCESS DASHBOARD’ at the top of the page, which will take you to a screen similar to the below |
|
|
Step 3 |
Select ‘Create Access’ |
|
|
Step 4 |
This will provide you with an option to select a ‘scope’ which will be the
reporting type you have been appointed as IT Expert for and select create:
|
|
|
Step 5 |
This will create a line in the S3 access dashboard with the report type, the
status (this should show ‘Granted’) and the date of this creation.
|
|
|
Step 6 |
This will reveal the information about the who the access has been granted to, when and what report it is for. It will also provide details of the unique codes specific to the entity, report type and individual. |
|
|
Step 7 |
Once the Keys have been generated, keeping your connection to eDesk open, in another window, open your efile environment. Log in using the efile Admin account for your entity and open the ‘Keys Management’ tab. |
|
|
Step 8 |
Select ‘Add Key’ on the far right of the screen |
|
|
Step 9 |
A pop out will appear and provide you with several drop down lists to complete. Under ‘Scope’ you should choose the report type that you are providing the Keys for. In this instance AIFMD should be selected. |
|
|
Step 10 |
Returning to eDesk, copy the Bucket code, the Access key and Secret key and paste each of these into the applicable boxes on efile. |

|


Correspondance table
Please find the correspondence table of e-file and e-Desk scopes
| Label scope in e-file | Label scope in e-Desk | CSSF reference | Deadline |
|---|---|---|---|
| Reporting AIFM | Reporting AIFM | AIFM reporting -Technical guidance | 30 June 2024 |
| Cross-border marketing notifications | Cross-border marketing notifications | User guide notifications CBDF | 2nd January 2024 |
| UCI Adminsitrator - Annual reporting | UCI Adminsitrator - Annual reporting | CSSF 22/811 | 30 June 2023 |
| Quarterly survey of covered deposits (FGDL) | Quarterly survey of covered deposits (FGDL) | CSSF-CPDI 24/40 | 15 May 2024 |
| SFDR - Precontractual disclosures | SFDR - Precontractual disclosures - SFO | SFDR precontractual data collection | 31 October 2023 |
| SFDR - periodical disclosures | SFDR - periodical disclosures - SFPER | SFDR UCI Data Collection | 31 January 2024 |
| EBA ITS standard reports | EBA ITS standard reports | Bank prudential reporting | 1st September 2024 |
| Regulatory Documents and Reports | Regulatory Documents and Reports | User Guide for Regulatory Documents and Reports | 15th November 2024 |
| Key Information Document (KID PRIIPs/KID) | Key Information Document (KID PRIIPs/KID) | User Guide for Key Information Document | 15th November 2024 |
| U1.1 reporting | U1.1 reporting | Guidelines on the U1.1 reporting | 15th November 2024 |
| Information on covered investment claims | Information on covered investment claims | Guidelines for the Yearly Survey on Covered Investment claims (SIIL) | 17th January 2025 |
| SAQ PDAOFI | SAQ PDAOFI | Guidelines on the self-assessment questionnaire PDAOFI | 31st March 2025 |
| Prospectus identification | Prospectus identification | Procedure change for visa "stamp" prospectuses | 1st April 2025 |
| Csdr article 9 | Csdr article 9 | User Guide Internalised Settlement Reporting Under Article 9 OF CSDR | 1st July 2025 |
| MMF Reporting | MMF Reporting | MMF reporting Handbook | 1st September 2025 |
| IRP XBRL Reporting | IRP XBRL Reporting | new IORP procedure | 15th January 2026
|
Special cases
For Key Information Document (KID PRIIPs/KID) and Regulatory Documents and Reports scopes
Due to the way the CSSF has implemented the third-party delegation process we have adapted our S3 scope import system in order to enable
the possibility for a client who is a service provider to onboard multiple S3 keys for the same scope on different Asset Managers / Self-managed funds / Filing entity based on the FSQ referential
To do so after having selected Key Information Document (KID PRIIPs/KID) or Regulatory Documents and Reports scope.
You have to use the dedicated radio button Asset Manager, Self-Managed funds or Filing Entity
The list is automatically refreshed to only display third-party without S3 key onboarded.
In case of a Filing Entity, the name of the Third party linked to the eFile user will be pre-filed (and can't be changed)

To help you identifying which key has already been imported on eFile a dedicated page has been added in the S3 Keys Management module
This page lists the already imported key for scope(s) allowing delegation.
The Bucket owner (entity that owns the S3 key) and the Provider (entity who uploaded the S3 key on eFile) are displayed.

- Grant us with the IT expert role to perform such changes for you
To start the process please send us an email to cso.desk@fundsquare.net with both name and CSSF identification number of the entity you want we become IT Expert
| Steps | Actions | Additional information |
|---|---|---|
|
Step 1 |
Log into eDesk with the Advanced User account using your LuxTrust Device and Password. Please note that these changes can only be implemented from the Advanced User account |
|
|
Step 2 |
Once logged in, go to the top right corner of the screen, click on your account user name, and select ‘Entity Management’ |
|
|
Step 3 |
Now select ‘Access Requests’ from the tabs at the top of the screen: |
|
|
Step 4 |
As FEfundinfo will have made a request to connect from our Fundsquare account, you will see us on a list of users requests to connect with your entity. You will be able to identify our request as it will be with the LuxTrust SN: 100115278245548987357 |
|
|
Step 5 |
Once you have identified the FE fundinfo request from our Fundsquare account, you can go to the far right of the screen and select ‘ACCEPT ACCESS’ or ‘REJECT ACCESS’. Remember to only accept requests and provide access to users you are associated with. You will need to ‘ACCEPT ACCESS’ on our request: |
|
|
Step 6 |
Once you have clicked accept, go to the ‘Specific roles within entity’ tab: |
|
|
Step 7 |
Under the ‘Specific roles within entity’ tab, on the right of the screen, click the ‘Add’ button: |
|
|
Step 8 |
You will now be able to click on the ‘User’ box and select a user within the list of approved users connected with your entity. One of these will be FE fundinfo’s Fundsquare account, select this option and the user details will populate automatically: |
|
|
Step 9 |
Now you can select a role for that user, in this case you will need to select IT EXPERT for FE fundinfo in the drop down selection and click save on the top right to make the change |
|
|
Step 10 |
You have now completed all you need to ensure continued use of efile and secure submission of your reports to the CSSF! FE fundinfo will do the rest and can now ensure that the changing transmission methods gradually introduced by the CSSF over the next 18 months are updated as needed without any impact on you |


- == Onboarding workflow map ==
You can click on the picture.

* general security questions
Each e-file administrator account is linked to a single email at a time.
3 cases :
- You have access to the account
- then change the email of the administrator by using the administration module and update the administrator account's owner (name, firstname). The new administrator will just have to request a new password.
- You have access to the administrator's e-mail box
- you can use the "forgotten password" button on https://www.e-file.lu to change the password and get access.
- You do not have access to the administrator account nor to the email of this account
- then for security reason you will have to follow this specific procedure:
- Your request must be sent by email and paper mail.
- The paper can be replaced by a mail with a scan of the letterhead paper => Send your email to e-file.support@fefundinfo.com.
The request must be submitted on letterhead of your company and signed by a legal representative with the following information:
- Administrator's login adminXXX
- The current email address which is linked to the administrator
- The new email address to link to the administrator
- A brief explanation of the reason why you need to change it
- Send your email to e-file.support@fefundinfo.com
Once Fundsquare has received and checked your request we will update your email and send you the procedure to update the password.
If you have further questions do not hesitate to contact our Client Support & Operations Desk.

(Figure 42)
The password you will have to provide must follow the rules below:
- At least one upper and one lower case letter
- At least one number
- At least one special character from this list: ! # $ % & ( ) * + , . /: ; < = > ? ^ _ @ { | } [ ] ~
- At least 8 characters and at most 20
Please note that :
The validity of your password is not limited in time.
Our system blocks the user after 3 incorrect attempts and it is the e-file administrator who has to unblock the account.
Passwords are encrypted in our database and we do not keep them. You may re-use them.
Being informed
As an administrator, you will received all significant information regarding e-file changes, maintenance or enhancement through the e-mail address set up onto your account. You can also manage some alerts through e-file, see the notifications system.
Please be informed that you can receive alert by email triggered by specific events.
Example : Court orders sent by the Luxembourgish judicial police (=> CSSF - Circular 13/566)
If you want to be notified by email each time the Luxembourgish judicial police sends you court orders, you have to follow the steps below.
Step 1 : Connect to e-file with your user credentials : https://www.e-file.lu/e-file/
Step 2 : Select Update my profile

Step 3 : Verify that your email address registered in your e-file account is valid.

IMPORTANT : if your email address is not valid, please ask your e-file administrator to replace it by a valid one.
Step 4 : Select Customize your notifications.

Step 5 : Select group.

Step 6 : Select the Alert type.

IMPORTANT :
A green window will pop-up stating that the update has been saved.
Optional Step 7 : Receive only your alerts and not the group's ones.
Ticking also the group box, the sends from other users of the same reports group will be ignored.
