Difference between revisions of "Test1"
| Line 4: | Line 4: | ||
<span style="color:white; background:DarkTurquoise"> '''Please be informed that we are working on a new e-file version of the '''Static Data Management''' ('''SDM''') application that will be delivered in the first quarter of 2020.''' </span> | <span style="color:white; background:DarkTurquoise"> '''Please be informed that we are working on a new e-file version of the '''Static Data Management''' ('''SDM''') application that will be delivered in the first quarter of 2020.''' </span> | ||
This modernized e-file version will introduce a <u>new design</u> and <u> | This modernized e-file version will introduce a <u>new design</u> and <u>improve ergonomics</u> for a better user experience. | ||
Please find below our '''Before - After User Guide''' where | Please find below our '''Before - After User Guide''' where all changes will be explained. | ||
| Line 28: | Line 28: | ||
[[File:BeforAfterLogin.png|border|800 px]] | [[File:BeforAfterLogin.png|border|800 px]] | ||
'''IMPORTANT:''' If you do not have an e-file user account, you might contact | '''IMPORTANT:''' If you do not have an e-file user account, you might contact the '''e-file administrator''' of your company. | ||
[[E-file Administration|=>for more detailed information please click the link '''e-file Administration''']] | [[E-file Administration|=>for more detailed information please click the link '''e-file Administration''']] | ||
Revision as of 10:44, 20 December 2019
Introduction
Please be informed that we are working on a new e-file version of the Static Data Management (SDM) application that will be delivered in the first quarter of 2020.
This modernized e-file version will introduce a new design and improve ergonomics for a better user experience.
Please find below our Before - After User Guide where all changes will be explained.
Select Test or Production environment
Production environment : https://www.e-file.lu/e-file/
Homologation environment (Test) : https://homologation.e-file.lu/e-file/
E-file login
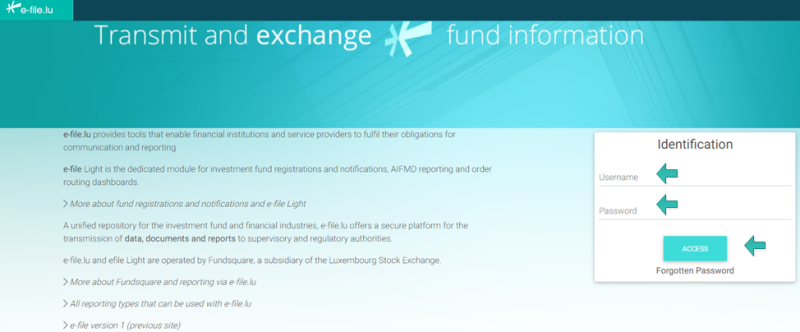
Enter your e-file login credentials (user name and password) and click the ACCESS button.
IMPORTANT: If you do not have an e-file user account, you might contact the e-file administrator of your company.
=>for more detailed information please click the link e-file Administration
Launchpad
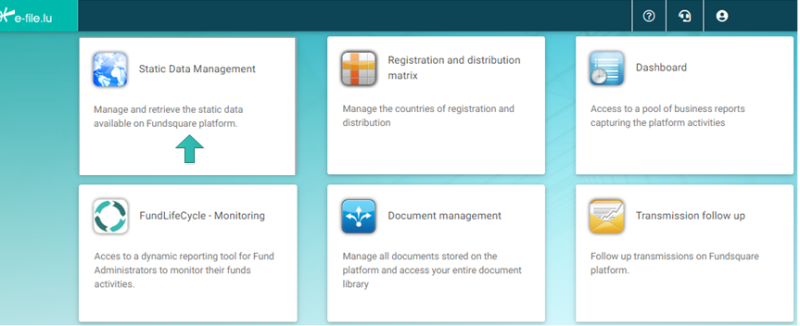
The e-file launchpad opens.
Click on the Static Data Management icon.
Select template - Before
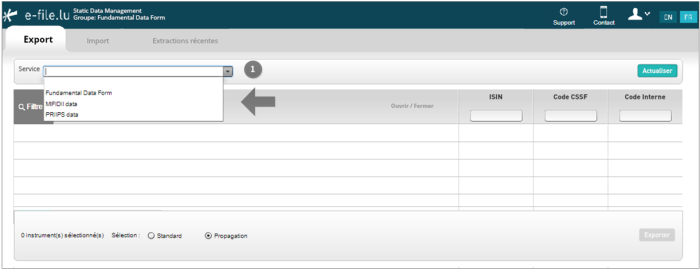
The Export screen opens.
![]() Open the drop-down list to select the SERVICE
Open the drop-down list to select the SERVICE
Select template - After
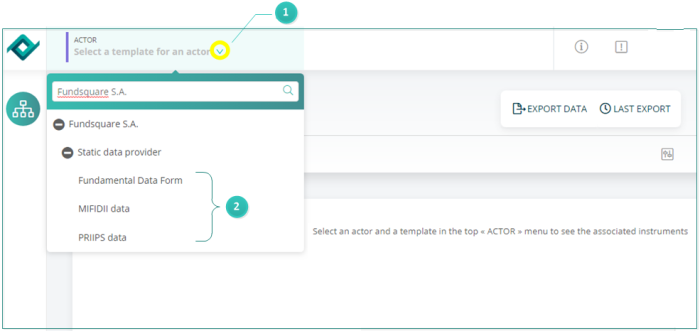
![]() Click on the arrow highlighted in yellow in the top left hand corner of the page to open the drop-down list to select the TEMPLATE
Click on the arrow highlighted in yellow in the top left hand corner of the page to open the drop-down list to select the TEMPLATE ![]()
Filter functions - Before
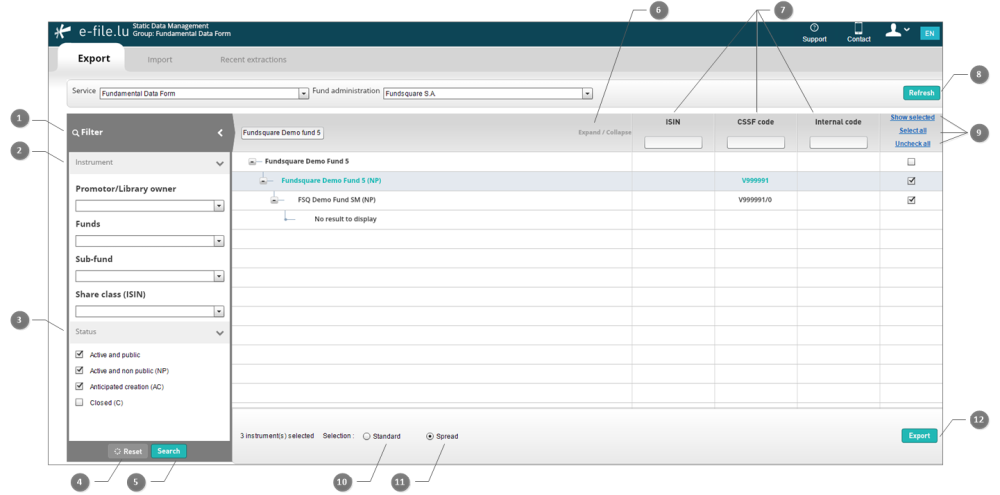
![]() Click on the FILTER button on the left side of the screen. A window opens where you can specify your search criteria.
Click on the FILTER button on the left side of the screen. A window opens where you can specify your search criteria.
![]() Narrow your search criteria by selecting the PROMOTER/LIBRARY OWNER, FUNDS, SUB-FUND, SHARE CLASS.
Narrow your search criteria by selecting the PROMOTER/LIBRARY OWNER, FUNDS, SUB-FUND, SHARE CLASS.
![]() Narrow your search criteria by selecting the STATUS of your instrument (e.g. active and public).
Narrow your search criteria by selecting the STATUS of your instrument (e.g. active and public).
![]() RESET button to clear all fields and start a new search.
RESET button to clear all fields and start a new search.
![]() SEARCH button to start the search.
SEARCH button to start the search.
![]() EXPAND/COLLAPSE button to display the whole fund tree (fund, sub-funds and share classes) (EXPAND) or to display only the fund level (COLLAPSE).
EXPAND/COLLAPSE button to display the whole fund tree (fund, sub-funds and share classes) (EXPAND) or to display only the fund level (COLLAPSE).
![]() Narrow your search criteria by entering the ISIN, CSSF CODE or INTERNAL CODE in the appropriate search field.
Narrow your search criteria by entering the ISIN, CSSF CODE or INTERNAL CODE in the appropriate search field.
![]() REFRESH button to make available the most updated version of the page you are viewing.
REFRESH button to make available the most updated version of the page you are viewing.
![]() Specify your display options: SHOW SELECTED instruments, SELECT ALL instruments, UNCHECK ALL boxes.
Specify your display options: SHOW SELECTED instruments, SELECT ALL instruments, UNCHECK ALL boxes.
![]() Specify your SELECTION option. STANDARD: each box of the fund tree has to be selected either manually or through the SELECT ALL button.
Specify your SELECTION option. STANDARD: each box of the fund tree has to be selected either manually or through the SELECT ALL button. ![]() SPREAD: the checked box of the fund will be automatically spread to the whole fund tree.
SPREAD: the checked box of the fund will be automatically spread to the whole fund tree.
![]() EXPORT button: all selected instruments (with checked boxes) will be exported in the file.
EXPORT button: all selected instruments (with checked boxes) will be exported in the file.
Filter functions - After
![]() Click on the FILTER button
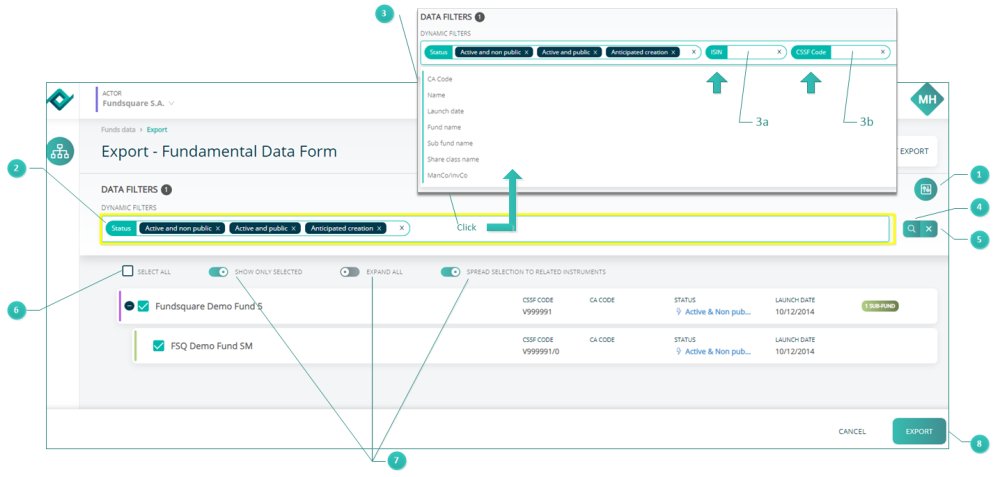
Click on the FILTER button ![]() on the right side of the screen. A toolbar (highlighted in yellow) opens where you can narrow your search options by specifying the
on the right side of the screen. A toolbar (highlighted in yellow) opens where you can narrow your search options by specifying the ![]() STATUS of the instrument (e.g. active and public).
STATUS of the instrument (e.g. active and public).
![]() Click inside the toolbar highlighted in yellow. A drop-down list DATA FILTERS pops up where you can narrow your search criteria by selecting e.g. ISIN, CSSF CODE. Enter your ISIN, CSSF CODE in the dedicated search field (3a, 3b) and
Click inside the toolbar highlighted in yellow. A drop-down list DATA FILTERS pops up where you can narrow your search criteria by selecting e.g. ISIN, CSSF CODE. Enter your ISIN, CSSF CODE in the dedicated search field (3a, 3b) and
![]() Press the SEARCH button or press ENTER.
Press the SEARCH button or press ENTER.
![]() Press the RESET button
Press the RESET button ![]() to clear all fields and reset filters.
to clear all fields and reset filters.
![]() If the SELECT ALL box is checked, all instruments of all management companies that are linked in our database to the ACTOR are selected.
If the SELECT ALL box is checked, all instruments of all management companies that are linked in our database to the ACTOR are selected.
- If the SHOW ONLY SELECTED button is green, only the selected instruments are displayed on the screen.
- If the EXPAND ALL button is green, the whole tree structure (fund, sub-fund, share class) of the instrument is displayed.
- If the SPREAD SELECTION TO RELATED INSTRUMENTS button is green and you select an instrument at fund level, the whole tree structure of the fund will be automatically selected.
![]() If you press the EXPORT button, all selected instruments with checked boxes will be exported in the file.
If you press the EXPORT button, all selected instruments with checked boxes will be exported in the file.
Export a file - Before
Press the EXPORT button.
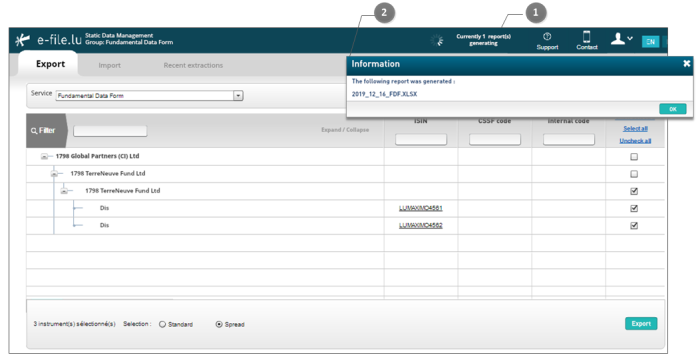
![]() A message on the top of the screen informs you that Currently 1 report(s) is generated.
A message on the top of the screen informs you that Currently 1 report(s) is generated.
![]() Once the file is generated, a window pops up indicating The following report was generated. Press the OK button to open the file.
Once the file is generated, a window pops up indicating The following report was generated. Press the OK button to open the file.
Export a file - After
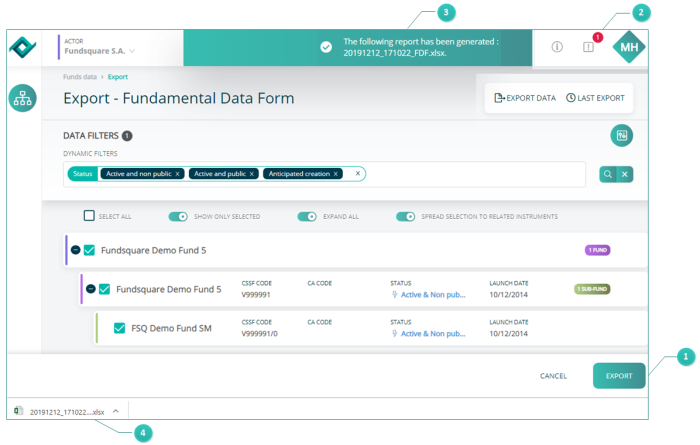
![]() The red notification indicates that one file is being generated or has been generated.
The red notification indicates that one file is being generated or has been generated.
![]() Once that file is generated, a window pops up indicating The following report has been generated.
Once that file is generated, a window pops up indicating The following report has been generated.
![]() Open the file that is available at the bottom of the page.
Open the file that is available at the bottom of the page.
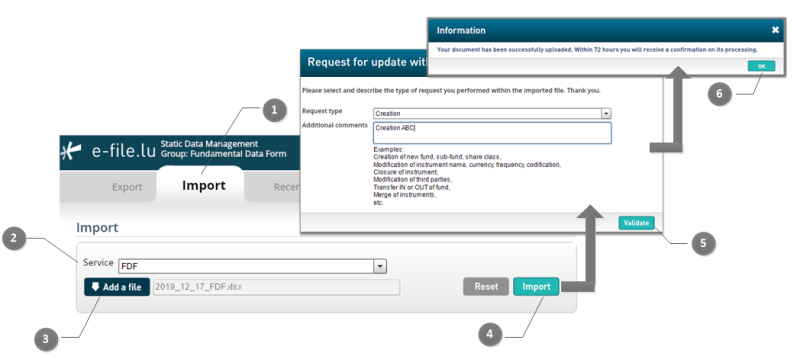
Import a file - Before
![]() Open the IMPORT tab on the top of the screen.
Open the IMPORT tab on the top of the screen.
![]() Press the button ADD a FILE and select the file you want to import.
Press the button ADD a FILE and select the file you want to import.
![]() A window REQUEST FOR UPDATE WITHIN THE FUNDSQUARE STATIC DATA REFERENTIAL pops up. Complete the fields and press the VALIDATE button.
A window REQUEST FOR UPDATE WITHIN THE FUNDSQUARE STATIC DATA REFERENTIAL pops up. Complete the fields and press the VALIDATE button.
![]() A window opens indicating that Your document has been successfully uploaded. Within 72 hours you will receive a confirmation on its processing.
A window opens indicating that Your document has been successfully uploaded. Within 72 hours you will receive a confirmation on its processing.
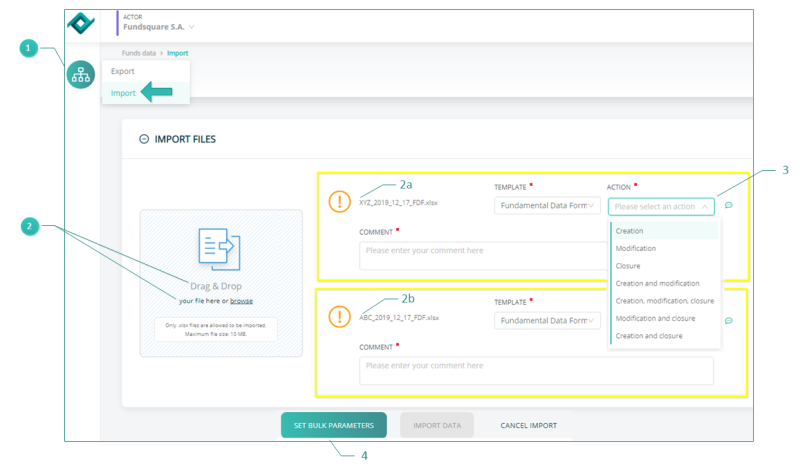
Import a file - After
![]() Press the FLOW-CHART button
Press the FLOW-CHART button ![]() . A small window pops up with two options: EXPORT and IMPORT. Select IMPORT.
. A small window pops up with two options: EXPORT and IMPORT. Select IMPORT.
![]() You have two options to upload your file:
You have two options to upload your file:
- - either you BROWSE your file system and select the file you want to upload
- NEW: Please be informed that new features have been added to the new e-file version of the Static Data Management application. You have now the possibility to upload several files at the same time.
- In our example we uploaded two files:
- ABC_2019_12_17_FDF.xlsx (cf. 2b)
- XYZ_2019_12_17_FDF.xlsx (cf. 2a)
![]() You have two options to add the mandatory parameters TEMPLATE, ACTION, COMMENT
You have two options to add the mandatory parameters TEMPLATE, ACTION, COMMENT
- - either you select each parameter for each single file
VERY IMPORTANT INFORMATION
Please ensure that you always follow the Fundsquare naming convention of the templates. The respective acronyms at the end of the file name are mandatory and they have to be preceded by an underscore. Please note that only .xlsx files are allowed to be imported.
FDF template: nnnnnnn_FDF.xlsx
MIFID template: nnnnnnn_MIFID.xlsx
PRIIPS template: nnnnnnn_PRIIPS.xlsx
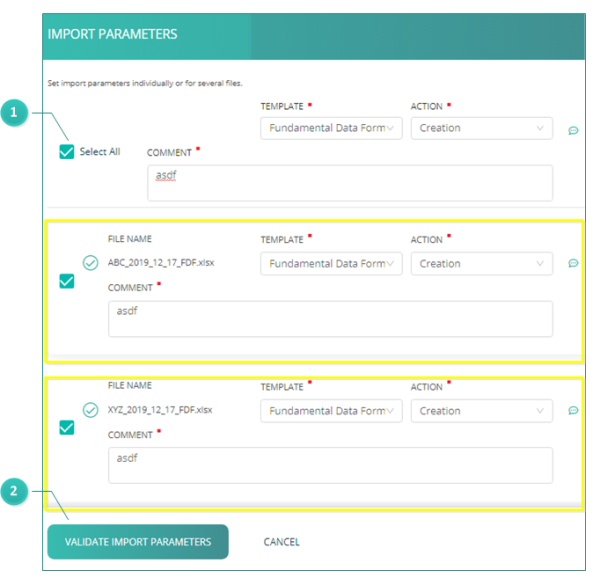
Set bulk parameters
![]() If you check the SELECT ALL box and complete all mandatory fields in this sections, all mandatory fields of the two files we imported, will be populated automatically with the same parameters.
If you check the SELECT ALL box and complete all mandatory fields in this sections, all mandatory fields of the two files we imported, will be populated automatically with the same parameters.
![]() Press the VALIDATE IMPORT PARAMETERS button.
Press the VALIDATE IMPORT PARAMETERS button.
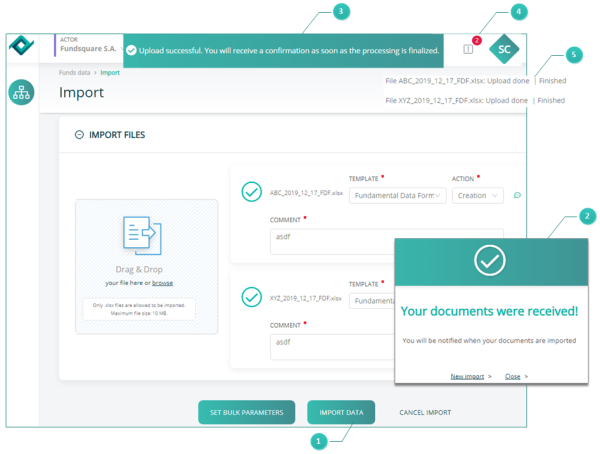
Import confirmation
![]() A window pops up indicating Your documents were received and
A window pops up indicating Your documents were received and
![]() another window pops up confirming that the import was successful.
another window pops up confirming that the import was successful.
![]() The red notification with number 2 inside, shows you that 2 files have been imported.
The red notification with number 2 inside, shows you that 2 files have been imported.
![]() If you click on the EXCLAMATION MARK, a drop down list with all imported files opens.
If you click on the EXCLAMATION MARK, a drop down list with all imported files opens.
Furthermore, please be informed, that you will receive a notification by email with detailed information on your files you imported.
How to use FSQ IDs in the Fundamental Data Form (FDF)
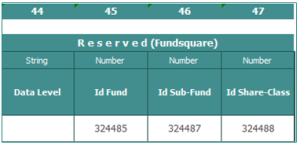
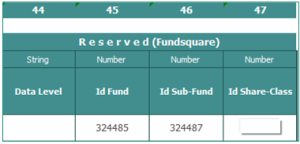
In the following, we would like to explain you, how to use Fundsquare's internal identification numbers of instruments which are available in column 45, 46, 47 of the Fundamental Data Form (Id Fund, Id Sub-Fund, Id Share-Class).
(1) Modification of an instrument
If you modify an instrument the three FSQ Id must not be changed under no circomstances.
For example, if you want to change a sub-fund name, the new name must be reported in the appropriate cell. DO NOT CHANGE the FSQ IDs.
(2) Closure of an instrument
If you want to close an instrument, the appropriate cells in column 13, 24, 34 have to be completed with the closure date. DO NOT CHANGE the FSQ IDs.
Please note, that if you close a fund, the whole fund tree structure will be closed in our database.
If you close a single sub-fund, all share classes belonging to this sub-fund will be closed in our database.
(3) Creation of a new fund
To create a new fund, select a standard FDF extraction with the same fund structure (SICAV i.e..) and the same Law directive (P110 i.e..) as the new one you will have to create.
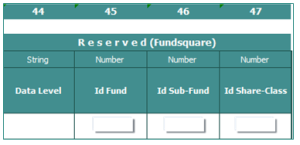
IMPORTANT: you must REMOVE all ID instruments from the cells in columns 45, 46 and 47 as they refer to a already existing instrument', and the risk is you replace the existing fund name by the new one).
(4) Creation of a new sub-fund
For example, if you want to add 3 sub-funds to an existing fund, you have to add 3 lines below the fund in the extraction template and complete the appropriate cells.
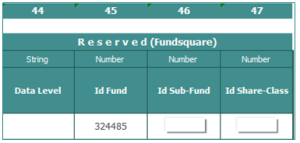
REMOVE Id Sub-Fund and Id Share-Class, but DO NOT CHANGE the Id Fund.
(5) Creation of a new share-classes
For example, if you want to add 5 share-classes to an existing sub-fund, you have to add 5 lines to the existing sub-fund structure in the extraction template. Complete all cells accordingly.
REMOVE Id Share-Class, but DO NOT CHANGE the Id Fund and Id Sub-Fund.
(6) Exception in column 28
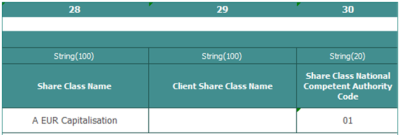
In the case of share class creations, we would like to ask you, for internal processing reasons only, to delete all "Capitalisation" and "Distribution" words that appear in column 28 by using the function "CTRL + H".
