Difference between revisions of "E-file – Disclosure management to investors"
(Created page with "<div style="text-align: right; direction: ltr; margin-left: 1em;">Home page File:Home.png|Return homepage|link=Welcome_to_e-file_and...") |
|||
| (81 intermediate revisions by one other user not shown) | |||
| Line 13: | Line 13: | ||
We hope you enjoy the new application as much as we do. | We hope you enjoy the new application as much as we do. | ||
For any feedback or inquiries, please do not hesitate to contact us at: | For any feedback or inquiries, please do not hesitate to contact us at: | ||
* dissemination@fundsquare.net | |||
* funddatasupport@fundsquare.net | |||
[[File:DiscInvest GreyedOut.png|alt=Disclosure management to investors is greyed out.|thumb|To have access : '''''Parametrage de diffusion''''' group ]] | |||
====== <big>Your module is greyed out? :</big> ====== | |||
To get access to this module, please ask your e-file local administrator to [[E-file Administration#Assign groups and profiles to users|make you member]] of the '''''Parametrage de diffusion''''' group. | |||
= Accessing the module module = | |||
Log in to e-File: '''https://www.e-file.lu/e-file/''' | |||
[[File:Access E-file.PNG|600 px]] | |||
Once connected, scroll down to the “Settings” section and select “Disclosure management to Investors”: | |||
[[File: | [[File:Setting.PNG|600 px]] | ||
=Presentation of the interface= | |||
==Dissemination Contracts level (Actor main view) – Overview== | |||
Once connected to the module: | |||
a) Provided that your account is linked to several Actors, you will be prompted to select one through the dropdown list at the top left (highlighted) part of the screen, as shown below: | |||
[[File:Once connected to the module.PNG|600 px]] | |||
Once you select the appropriate actor, the dissemination contracts linked to the corresponding Actor will appear: | |||
[[File:Once you select the appropriate actor.PNG|800 px]] | |||
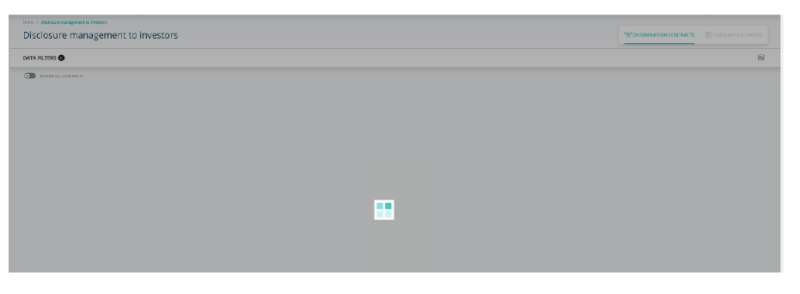
b) If your account is linked only to one Actor, the application will immediately start loading the data relevant to your portfolio. Please wait until the loading symbol is no longer visible: | |||
[[File: | [[File:If your account is linked only to one Actor.PNG|800 px]] | ||
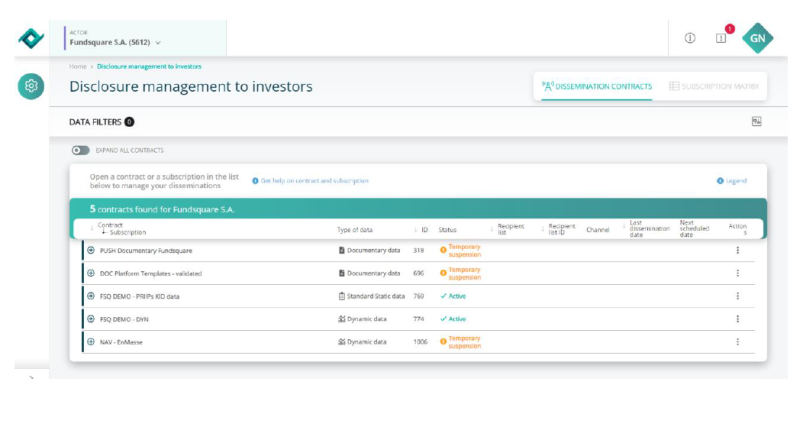
Once the data is loaded, you will be presented with your (actor level) account overview. All dissemination contracts associated with it should appear: | |||
[[File:Once the data is loaded.PNG|800 px]] | |||
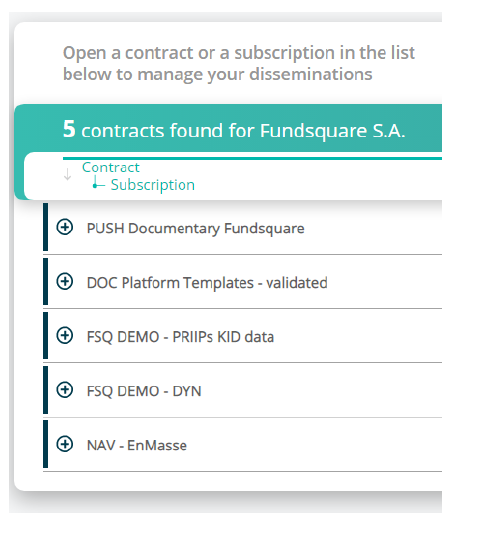
In either case, the associated contracts are visible on the left side of the screen: | |||
[[File: | [[File:In either case.PNG|600 px]] | ||
The overview also includes some basic information (Type of data, ID, Status, etc.): | |||
[[File:The overview also.PNG|800 px]] | |||
In order to see the dissemination lists that are linked to a contract, click the corresponding “+” button: | |||
[[File:In order to see the dissemination.PNG|800 px]] | |||
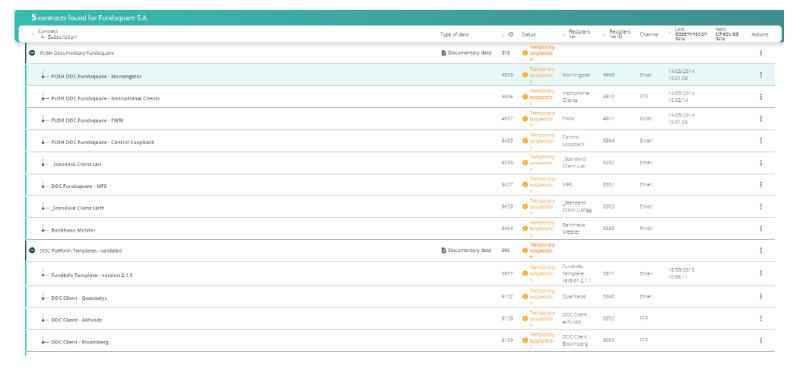
You can also expand all contracts to view all the associated dissemination lists: | |||
[[File: | [[File:You can also expand.PNG|200 px]] | ||
Note how the field “ID” now refers to both contracts and lists: | |||
[[File: | [[File:Note how the field “ID”.PNG|800 px]] | ||
You can sort the displayed contracts by: | |||
*name of Contract-Subscription | |||
*ID (based on contract ID) | |||
*Recipient list | |||
*Recipient list ID | |||
*Last dissemination date | |||
Simply hover over the corresponding field (it will highlighted in blue) and click repeatedly for increasing/decreasing/initial order according to your liking: | |||
[[File: | [[File:Recipient list.PNG|250 px]] | ||
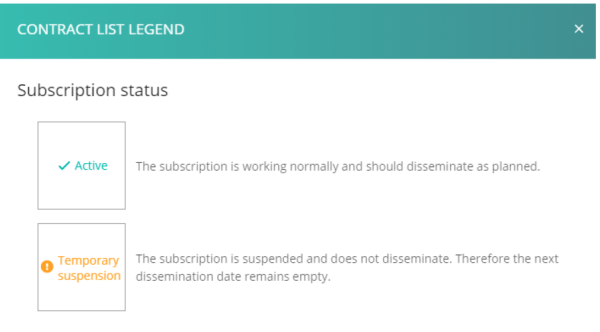
By clicking on the [[File:Legend.PNG|border]] button, you can open a panel with indications/hints on the data shown: | |||
[[File:Contract List Legend.PNG|600 px]] | |||
The indications “DISSEMINATION CONTRACTS” and “SUBSCRIPTION MATRIX” at the top right corner state whether you are currently at actor level (“DISSEMINATION CONTRACTS”) or at contract level (“SUBSCRIPTION MATRIX”). Once on contract level, you can go back to the actor level by clicking on “DISSEMINATION CONTRACTS”: | |||
[[File: | [[File:Dissemination Contracts.PNG|600 px]] | ||
==Dissemination Contracts level (Actor main view) - Filters== | |||
In order to filter the data displayed, you can click on the [[File:Filter Button.PNG|border]] button. | |||
This will allow you to select several filters: | |||
[[File:Several filter.PNG|800 px]] | |||
[[File: | You can then: | ||
*apply the filters by clicking [[File:Apply filter.PNG|border]] (alternatively pressing enter after input) | |||
*reset them by clicking [[File:Reset filter.PNG|border]] | |||
==Dissemination Contracts level (Actor main view) – Actions== | |||
In order to show the list of actions applicable to a contract, click the action button [[File:Trois points button.PNG|border]] on the right. | |||
The following buttons will appear, [[File:Open Matrix Diss.PNG|border]] which correspond to: | |||
*“Export reports” - This allows you to download report files for the contract (more details below) | |||
*“Open dissemination matrix” - This allows you to see all the dissemination lists that are linked to the contract in detail | |||
If you have expanded a contract and the dissemination lists are now visible, click the action button [[File:Trois points button.PNG|border]] of a list. The following buttons will appear, which [[File:Open Matrix Sub.PNG|border]] correspond to: | |||
*“Export reports” - This allows you to extract the reports available for the dissemination list | |||
*“Set status as active”/ “Set status to temporary suspension” - This activates/deactivates the list | |||
*“Open matrix for this subscription” - This opens the subscription matrix (more details below) | |||
*“Consult subscription details” - This shows various information related to the dissemination list | |||
==Dissemination Contracts level (Actor main view) – Contract reports== | |||
[[File: | Under your (actor level) account overview, you can extract reports on a contract level. | ||
Simply click the action button [[File:Trois points button.PNG|border]] and then the [[File:Extract Button.PNG|border]] button. | |||
A panel will appear showing you the reports that are available, depending on the data type of the contract: | |||
*Documentary data : | |||
o Export (extracts the subscription matrix) | |||
o Audit (tracks the instruments disseminated) | |||
o Country-Language Matrix (shows the countries and languages that are associated with the dissemination) | |||
*Dynamic Data : | |||
o Export (extracts the subscription matrix) | |||
*Standard Static Data : | |||
o Export (extracts the subscription matrix) | |||
o Dissemination Audit (tracks the instruments disseminated) | |||
o Scope evolution report (tracks the scope updates) | |||
*MIFID Data : | |||
o Data recipient report (tracks the recipient updates on the dissemination lists) | |||
o Dissemination Audit (tracks the instruments disseminated) | |||
o Scope evolution report (tracks the scope updates) | |||
*PRIIPS Data : | |||
o Data recipient report (tracks the recipient updates on the dissemination lists) | |||
o Dissemination Audit (tracks the instruments disseminated) | |||
o Scope evolution report (tracks the scope updates) | |||
==Subscription matrix level (Dissemination lists per contract) - Overview== | |||
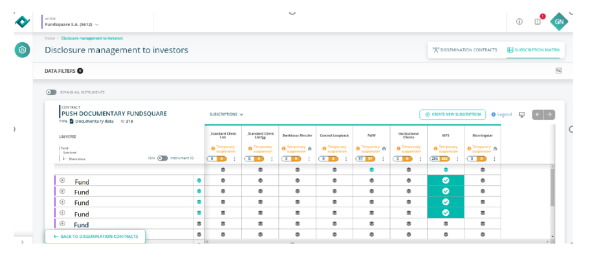
As mentioned above, once you click on the “Open subscription matrix” button [[File:Matrix Boutton.PNG|border]] of a contract, all dissemination lists linked to the contract will appear. The list of instruments in your dissemination universe will also show: | |||
[[File: | [[File:Push Documentary.PNG|600 px]] | ||
The main information of the contract appears on top: | |||
[[File:Push Doc FSQ.PNG|400 px]] | |||
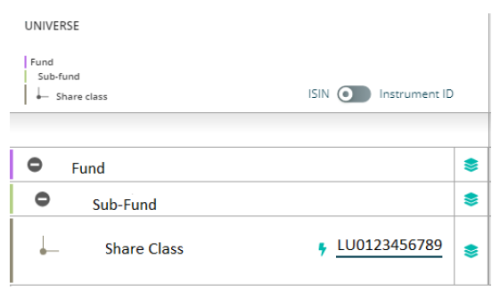
The dissemination universe is the range (i.e. scope) of instruments that can be included in your dissemination lists. This will eventually have an impact on the amount of instruments included in the dissemination files: | |||
[[File:Universe.PNG|500 px]] | |||
Each dissemination list has its main information displayed as a header: | |||
[[File:Standard Client.PNG|125px]] | |||
Analyzing the header: | |||
* [[File:Standard Client List.PNG|85px]]: Shows the name of the dissemination list | |||
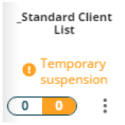
* [[File:Temporary suspension.PNG|85px]]:Shows the current status of the dissemination list (whether it is active or suspended) | |||
* [[File:Capture0-0.PNG|85px]]: Shows the number of included instruments in a dissemination list before and after a change (NB: if both numbers are the same then it means no change has been done) | |||
* [[File:Trois points button.PNG|border]]:Pressing the action button will cause the following buttons [[File:Export Report.PNG|border]] to appear, allowing you to proceed with the actions below: | |||
o “Export reports”, to extract reports related to a dissemination list | |||
o “Set status as active”/ “Set status to temporary suspension”, to activate/deactivate the dissemination list | |||
o “Consult subscription details”, to show various details related to the dissemination list | |||
==Subscription matrix level (Dissemination lists per contract) – Buttons== | |||
Under the Subscription matrix view, certain buttons appear on the right part of the screen. Example: | |||
[[File:Creation New Sub.PNG|400 px]] | |||
You can: | |||
*(Available only for Documentary data) Create a new dissemination list by selecting the button [[File:Creation New sub Button.PNG|300 px]] and following the subsequent steps (for more details please refer to “2.3 Subscription matrix level (Dissemination lists per contract) Creating a new Doc list list” below) | |||
*Show the legend relevant to the view by clicking the button [[File:Legend.PNG|border]] | |||
[[File:Suscription Matrix Legend.PNG|400 px]] | |||
[[File: | *Show more of the dissemination universe by clicking the [[File:Enter-exit Button.PNG|border]] button (Enter/Exit full screen mode) | ||
*Navigate through the dissemination lists using the button [[File:Fleche-fleche.PNG|border]] | |||
In order to show all the instruments of your universe (portfolio), click the button [[File:Expand all instrument.PNG|border]]. | |||
The [[File:Isin-Instrument ID.PNG|border]] button changes the view of the instruments between ISINs and internal Fundsquare IDs (for easier reference): | |||
[[File:Push Doc-Morningstar.PNG|400 px]] | |||
Finally, the “SUBSCRIPTIONS” button will bring out a dropdown menu with numerous options to change the way the dissemination lists of the contract are displayed: | |||
[[File:Subscription.PNG|400 px]] | |||
In order to change the view settings, click accordingly to pick your selections and finally click “APPLY” so that your changes are saved. Feel free to experiment with the options available and find out what facilitates your workflow in the best possible way. | |||
==Subscription matrix level (Dissemination lists per contract) – Creating a new Doc list== | |||
Provided that you are on a Documentary data contract, you can create a new subscription list for Documentary data dissemination. To create a new Document (Doc) list, go to the subscription matrix of the contract you want the addition to take place and select: [[File:Creation New sub Button.PNG|300 px]] | |||
In the platform examples list that appears*, select the one you wish to create a dissemination list for: | |||
[[File:List client.PNG|600 px]] | |||
Then choose a name for the dissemination list: | |||
[[File:Name of recipient.PNG|300 px]] | |||
[[File: | *If your platform of input does not appear as an option, select the standard client list [[File:Client list button.PNG|100 px]] and proceed with choosing a name. | ||
To complete the creation, click: | |||
[[File:Creation New sub Button.PNG|300 px]] | |||
You can then add the scope and the recipients to the new list prior to activating it. For any Country Language Matrix (CLM) requirements (i.e. dissemination to specific countries, etc.), please contact us at funddatasupport@fundsquare.net and/or dissemination@fundsquare.net prior to list activation. | |||
==Subscription matrix level (Dissemination lists per contract) - Filters== | |||
[[File: | Similar to the “Dissemination Contracts level (Actor main view)”, a set of filters is available by clicking the [[File:Filter Button.PNG|border]] button: | ||
[[File:Data filter.PNG|600 px]] | |||
The filters are categorized under 3 groups. Multiple filters (from different groups) can be used simultaneously: | |||
[[File:Data filter-Instrument-Sub.PNG|600 px]] | |||
You can apply a filter by clicking [[File:Apply filter.PNG|border]] (or pressing enter while in input) and reset them by clicking [[File:Reset filter.PNG|border]] | |||
==Subscription matrix level (Dissemination lists per contract) – Access/edit the scope of a list== | |||
You can access and update the scope of a dissemination list. | |||
Click on the [[File:Matrix Boutton.PNG|border]] “Open subscription matrix” button of a contract. | |||
The dissemination scope is the amount of instruments selected in the dissemination universe. | |||
In the example below, there are 0 instruments in the scope of the list (no share classes are selected): | |||
[[File:Doc client allfund.PNG|150px]] | |||
You can add all the instruments linked to a fund/sub-fund by clicking the top [[File:Top button.PNG|border]] icon (parent level selection) or individual share classes by clicking on their corresponding boxes. The number of instruments to be added is shown in orange (right indicator). Here, we selected 2 funds (on parent level) having 9 ISINs: | |||
[[File:Doc client allfund=Temporary suspension.PNG|150px]] | |||
A footer pop-up appears when you select instruments to be added or removed; it indicates how many changes are about to be made and provide you with the option to either save or cancel the changes: | |||
[[File:9 changes identifed.PNG|700px]] | |||
After the changes are saved, you will see that the instruments are now included in the dissemination scope: | |||
== | [[File:Doc client allfund=Temporary suspension=9.PNG|150px]] | ||
Note how the number of share classes in the existing scope (left indicator) is now different reflecting the changes: [[File:9=9 bouton.PNG|border]] | |||
==Subscription matrix level (Dissemination lists per contract) – Access/edit list details== | |||
It is possible to access the basic information of a list and edit some of its attributes. | |||
Click on the [[File:Matrix Boutton.PNG|border]] “Open subscription matrix” button of a contract to access the list. | |||
Then click the action button [[File:Trois points button.PNG|border]] of the dissemination list you wish to see more information for or edit. | |||
Finally, select the “Consult subscription details” [[File:Oeil Button.PNG|border]] button. | |||
The panel that appears will include a top information part similar to the one below: | |||
[[File:General Subscription.PNG|800 px]] | |||
[[File: | The [[File:Trois points button.PNG|border]] button of the panel will enable you again to: | ||
* extract the reports available for the list | |||
* set the dissemination list as active/suspended | |||
The panel has also three (3) distinct tabs: | |||
1. The first tab [[File:Recipients.PNG|border]] contains the list of email addresses or FTP folders that the dissemination files will be sent to. | |||
You can add recipients by clicking the [[File:Add Recipients.PNG|border]] button. | |||
You can remove recipients by clicking on the tick box on the left and then selecting the [[File:Delete.PNG|border]] button that appears on the bottom-right of the screen. Alternatively, you can click the action button and then the [[File:Poubelle.PNG|border]] button that appears. | |||
2. The second tab [[File:Timing.PNG|border]] will show you date and time related information relevant to the dissemination list: | |||
[[File:Frequency.PNG|200 px]] | |||
3. The third tab [[File:Scope.PNG|border]] will show you information regarding the dissemination scope in place for the list, as well as giving you the possibility to update it (“Edit scope” section). | |||
*The first way to alter the scope at this level is by adding ISINs to the existing scope. This can be achieved by listing them one by one without spaces, separated with a comma, in the text box provided. (Example: “LU1237426698,LU1238983620,LU1239859509”). Click [[File:Add Isins.PNG|border]] to confirm your addition. | |||
A warning pop-up will appear if the instruments you are trying to add are not included in the dissemination universe. Please double check your entry. | |||
[[File: | [[File:Modification Scope.PNG|400 px]] | ||
If the data is valid but you still cannot proceed with the addition, please contact funddatasupport@fundsquare.net and/or dissemination@fundsquare.com. | |||
*The second way of updating the scope of a dissemination list is by overwriting the existing scope and replacing it with a new one. This can be accomplished by uploading a .csv file with the new scope. The file should contain all ISINs vertically in the first column without any form of separation: | |||
[[File:Excel.PNG|200 px]] | |||
To upload your .csv file, drag and drop it on the designated [[File:Sortie.PNG|border]] area or click [[File:Browse File.PNG|border]] and locate the file via the directory that appears. | |||
Once the new instruments are added, you can save your changes by clicking [[File:Save Scope.PNG|border]] | |||
Note: This process does not add ISINS to the existing the scope but replaces it with the scope indicated in the .csv file uploaded. | |||
[[File: | |||
[[File: | |||
[[File: | |||
Latest revision as of 14:22, 22 February 2024
Introduction
The “Disclosure management to investors” module is a new application available to you through e-File, which will eventually replace the existing “Dissemination set up” module that you are already familiar with.
This short guide aims at presenting you with the basic functions of the module -even though, as you will soon realize, it is designed with simplicity and intuitiveness in mind.
We hope you enjoy the new application as much as we do. For any feedback or inquiries, please do not hesitate to contact us at:
- dissemination@fundsquare.net
- funddatasupport@fundsquare.net
Your module is greyed out? :
To get access to this module, please ask your e-file local administrator to make you member of the Parametrage de diffusion group.
Accessing the module module
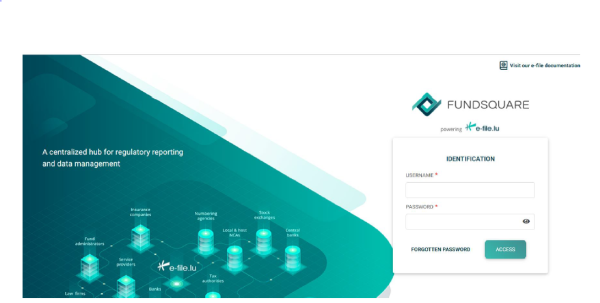
Log in to e-File: https://www.e-file.lu/e-file/
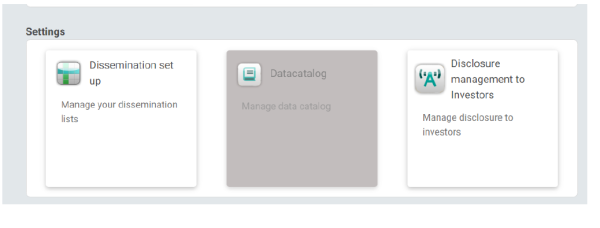
Once connected, scroll down to the “Settings” section and select “Disclosure management to Investors”:
Presentation of the interface
Dissemination Contracts level (Actor main view) – Overview
Once connected to the module:
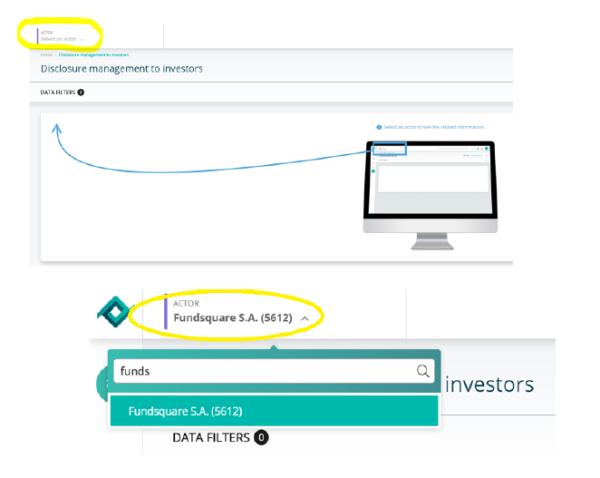
a) Provided that your account is linked to several Actors, you will be prompted to select one through the dropdown list at the top left (highlighted) part of the screen, as shown below:
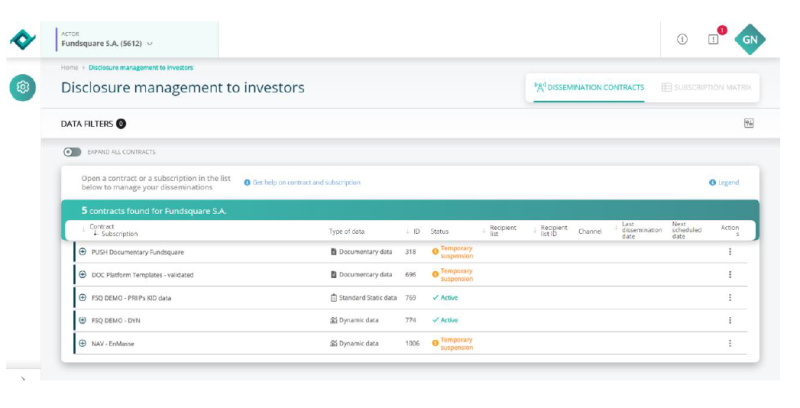
Once you select the appropriate actor, the dissemination contracts linked to the corresponding Actor will appear:
b) If your account is linked only to one Actor, the application will immediately start loading the data relevant to your portfolio. Please wait until the loading symbol is no longer visible:
Once the data is loaded, you will be presented with your (actor level) account overview. All dissemination contracts associated with it should appear:
In either case, the associated contracts are visible on the left side of the screen:
The overview also includes some basic information (Type of data, ID, Status, etc.):
In order to see the dissemination lists that are linked to a contract, click the corresponding “+” button:
You can also expand all contracts to view all the associated dissemination lists:
Note how the field “ID” now refers to both contracts and lists:
You can sort the displayed contracts by:
- name of Contract-Subscription
- ID (based on contract ID)
- Recipient list
- Recipient list ID
- Last dissemination date
Simply hover over the corresponding field (it will highlighted in blue) and click repeatedly for increasing/decreasing/initial order according to your liking:
By clicking on the 
The indications “DISSEMINATION CONTRACTS” and “SUBSCRIPTION MATRIX” at the top right corner state whether you are currently at actor level (“DISSEMINATION CONTRACTS”) or at contract level (“SUBSCRIPTION MATRIX”). Once on contract level, you can go back to the actor level by clicking on “DISSEMINATION CONTRACTS”:
Dissemination Contracts level (Actor main view) - Filters
In order to filter the data displayed, you can click on the button.
This will allow you to select several filters:
You can then:
Dissemination Contracts level (Actor main view) – Actions
In order to show the list of actions applicable to a contract, click the action button 

- “Export reports” - This allows you to download report files for the contract (more details below)
- “Open dissemination matrix” - This allows you to see all the dissemination lists that are linked to the contract in detail
If you have expanded a contract and the dissemination lists are now visible, click the action button 

- “Export reports” - This allows you to extract the reports available for the dissemination list
- “Set status as active”/ “Set status to temporary suspension” - This activates/deactivates the list
- “Open matrix for this subscription” - This opens the subscription matrix (more details below)
- “Consult subscription details” - This shows various information related to the dissemination list
Dissemination Contracts level (Actor main view) – Contract reports
Under your (actor level) account overview, you can extract reports on a contract level.
Simply click the action button 

- Documentary data :
 o Export (extracts the subscription matrix)
 o Audit (tracks the instruments disseminated)
 o Country-Language Matrix (shows the countries and languages that are associated with the dissemination)
- Dynamic Data :
o Export (extracts the subscription matrix)
- Standard Static Data :
 o Export (extracts the subscription matrix)
 o Dissemination Audit (tracks the instruments disseminated)
 o Scope evolution report (tracks the scope updates)
- MIFID Data :
 o Data recipient report (tracks the recipient updates on the dissemination lists)
 o Dissemination Audit (tracks the instruments disseminated)
 o Scope evolution report (tracks the scope updates)
- PRIIPS Data :
 o Data recipient report (tracks the recipient updates on the dissemination lists)
 o Dissemination Audit (tracks the instruments disseminated)
 o Scope evolution report (tracks the scope updates)
Subscription matrix level (Dissemination lists per contract) - Overview
As mentioned above, once you click on the “Open subscription matrix” button of a contract, all dissemination lists linked to the contract will appear. The list of instruments in your dissemination universe will also show:
The main information of the contract appears on top:
The dissemination universe is the range (i.e. scope) of instruments that can be included in your dissemination lists. This will eventually have an impact on the amount of instruments included in the dissemination files:
Each dissemination list has its main information displayed as a header:
Analyzing the header:
: Shows the name of the dissemination list
:Shows the current status of the dissemination list (whether it is active or suspended)
: Shows the number of included instruments in a dissemination list before and after a change (NB: if both numbers are the same then it means no change has been done)
:Pressing the action button will cause the following buttons
to appear, allowing you to proceed with the actions below:
  o “Export reports”, to extract reports related to a dissemination list
  o “Set status as active”/ “Set status to temporary suspension”, to activate/deactivate the dissemination list
  o “Consult subscription details”, to show various details related to the dissemination list
Subscription matrix level (Dissemination lists per contract) – Buttons
Under the Subscription matrix view, certain buttons appear on the right part of the screen. Example:
You can:
- (Available only for Documentary data) Create a new dissemination list by selecting the button
and following the subsequent steps (for more details please refer to “2.3 Subscription matrix level (Dissemination lists per contract) Creating a new Doc list list” below)
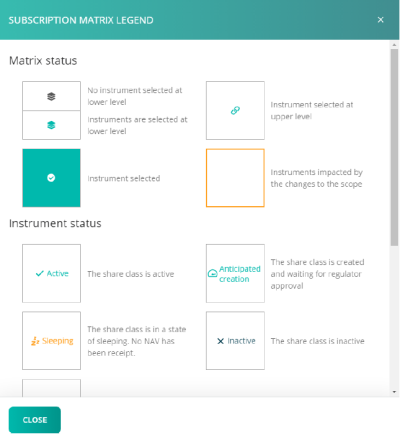
- Show the legend relevant to the view by clicking the button
- Show more of the dissemination universe by clicking the
button (Enter/Exit full screen mode)
- Navigate through the dissemination lists using the button
In order to show all the instruments of your universe (portfolio), click the button 
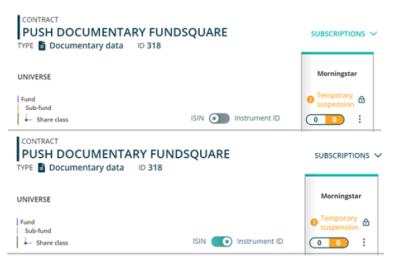
The button changes the view of the instruments between ISINs and internal Fundsquare IDs (for easier reference):
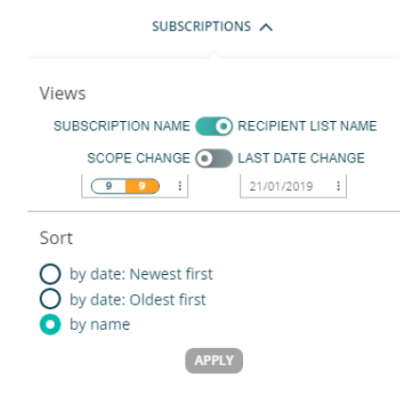
Finally, the “SUBSCRIPTIONS” button will bring out a dropdown menu with numerous options to change the way the dissemination lists of the contract are displayed:
In order to change the view settings, click accordingly to pick your selections and finally click “APPLY” so that your changes are saved. Feel free to experiment with the options available and find out what facilitates your workflow in the best possible way.
Subscription matrix level (Dissemination lists per contract) – Creating a new Doc list
Provided that you are on a Documentary data contract, you can create a new subscription list for Documentary data dissemination. To create a new Document (Doc) list, go to the subscription matrix of the contract you want the addition to take place and select: 
In the platform examples list that appears*, select the one you wish to create a dissemination list for:
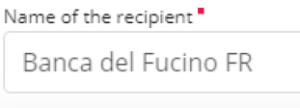
Then choose a name for the dissemination list:
- If your platform of input does not appear as an option, select the standard client list
and proceed with choosing a name.
To complete the creation, click:

You can then add the scope and the recipients to the new list prior to activating it. For any Country Language Matrix (CLM) requirements (i.e. dissemination to specific countries, etc.), please contact us at funddatasupport@fundsquare.net and/or dissemination@fundsquare.net prior to list activation.
Subscription matrix level (Dissemination lists per contract) - Filters
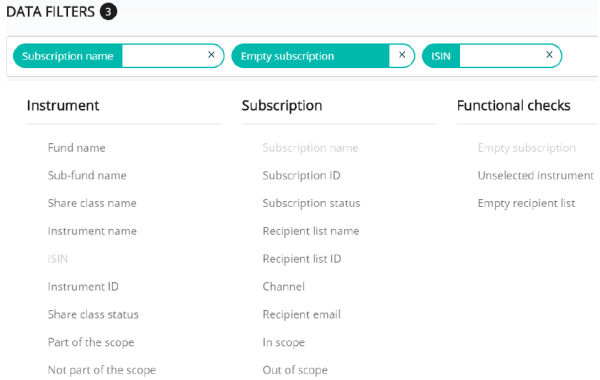
Similar to the “Dissemination Contracts level (Actor main view)”, a set of filters is available by clicking the button:
The filters are categorized under 3 groups. Multiple filters (from different groups) can be used simultaneously:
You can apply a filter by clicking 

Subscription matrix level (Dissemination lists per contract) – Access/edit the scope of a list
You can access and update the scope of a dissemination list.
Click on the “Open subscription matrix” button of a contract.
The dissemination scope is the amount of instruments selected in the dissemination universe.
In the example below, there are 0 instruments in the scope of the list (no share classes are selected):
You can add all the instruments linked to a fund/sub-fund by clicking the top icon (parent level selection) or individual share classes by clicking on their corresponding boxes. The number of instruments to be added is shown in orange (right indicator). Here, we selected 2 funds (on parent level) having 9 ISINs:
A footer pop-up appears when you select instruments to be added or removed; it indicates how many changes are about to be made and provide you with the option to either save or cancel the changes:
After the changes are saved, you will see that the instruments are now included in the dissemination scope:
Note how the number of share classes in the existing scope (left indicator) is now different reflecting the changes:
Subscription matrix level (Dissemination lists per contract) – Access/edit list details
It is possible to access the basic information of a list and edit some of its attributes.
Click on the “Open subscription matrix” button of a contract to access the list.
Then click the action button

button.
The panel that appears will include a top information part similar to the one below:
The 
- extract the reports available for the list
- set the dissemination list as active/suspended
The panel has also three (3) distinct tabs:
1. The first tab 
button.
You can remove recipients by clicking on the tick box on the left and then selecting the


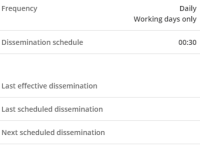
2. The second tab 
3. The third tab 
- The first way to alter the scope at this level is by adding ISINs to the existing scope. This can be achieved by listing them one by one without spaces, separated with a comma, in the text box provided. (Example: “LU1237426698,LU1238983620,LU1239859509”). Click
to confirm your addition.
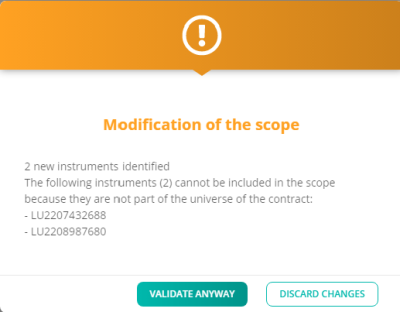
A warning pop-up will appear if the instruments you are trying to add are not included in the dissemination universe. Please double check your entry.
If the data is valid but you still cannot proceed with the addition, please contact funddatasupport@fundsquare.net and/or dissemination@fundsquare.com.
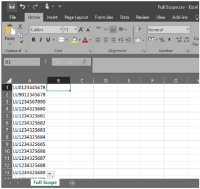
- The second way of updating the scope of a dissemination list is by overwriting the existing scope and replacing it with a new one. This can be accomplished by uploading a .csv file with the new scope. The file should contain all ISINs vertically in the first column without any form of separation:
To upload your .csv file, drag and drop it on the designated 
and locate the file via the directory that appears.
Once the new instruments are added, you can save your changes by clicking
Note: This process does not add ISINS to the existing the scope but replaces it with the scope indicated in the .csv file uploaded.
